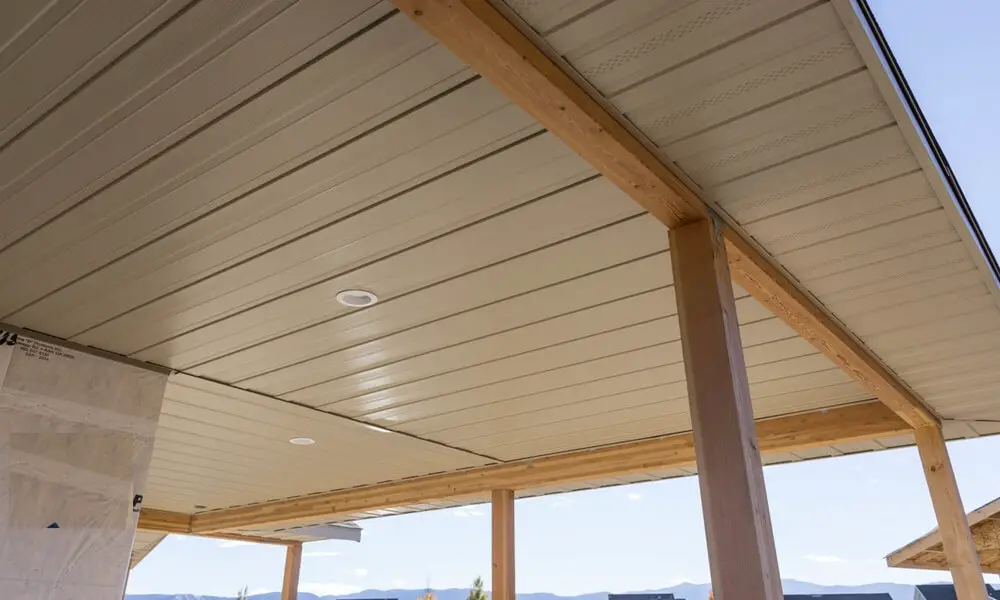
Inexpensive Porch Ceiling Ideas
Your home is not just a structure; it’s a reflection of your style and personality. While we often focus on interior design, the exterior, particularly the porch, is an essential canvas for creating a warm and inviting atmosphere. Among the various elements that contribute to the charm of your porch, the often-overlooked porch ceiling plays a crucial role.
The porch ceiling is more than just a protective covering; it sets the tone for the entire outdoor space. A well-designed porch ceiling can enhance the visual appeal of your home, providing an aesthetically pleasing backdrop for relaxation and socializing. It’s a canvas waiting to be adorned with creativity and style.
Why Update Your Porch Ceiling on a Budget?
You might be wondering why investing in a porch ceiling update is worthwhile, especially when trying to stick to a budget. Here are some compelling reasons to consider:
- Enhanced Aesthetics: A well-designed porch ceiling can elevate the appearance of your outdoor area, adding charm and personality to your home.
- Increased Home Value: Home improvement projects, even small ones like porch ceiling updates, can positively impact the resale value of your property.
- Curb Appeal: A beautiful porch ceiling can boost your home’s curb appeal, making it more appealing to potential buyers or visitors.
- Refreshed Ambiance: Changing the look of your porch ceiling can give the entire space a fresh and revitalized ambiance.
- Easy DIY Projects: Many of the ideas we’ll explore here are simple and DIY-friendly, allowing you to save money on labor costs.
You may also like:
10 Inexpensive Porch Ceiling Ideas
1. Outdoor Fabric Magic Porch Ceiling
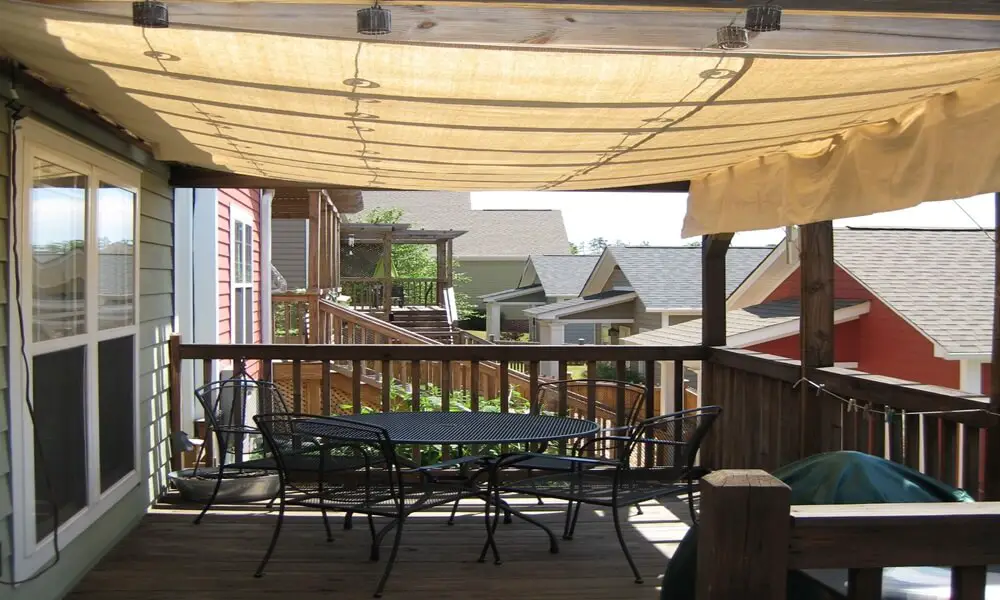
Wrap your porch in a burst of color and patterns by using outdoor fabric. This versatile material not only adds vibrancy but also provides a quick and affordable facelift. Stretch the fabric tightly across the ceiling, securing it with staples or Velcro for a dynamic and ever-changing look. As seasons shift, so can your porch’s ambiance.
Choosing the right fabric for your porch ceiling is a crucial step in creating an inviting and aesthetically pleasing outdoor space. From weather resistance to installation tips, let’s explore the elements that will guide you in making the perfect fabric choices.
Fabric Choices:
1. Weather-resistant:
Opt for fabrics specifically designed for outdoor use. They should be fade-resistant, water-repellent, and breathable to prevent mildew. Acrylic, Sunbrella, and marine-grade canvas are excellent choices for enduring the elements and maintaining their vibrant appearance.
2. Weight and Drape:
Consider the fabric’s weight and drape for the desired visual effect. Lightweight fabrics like voile or organza will gracefully flow in the breeze, creating an ethereal atmosphere. On the other hand, heavier options like canvas or awning fabric make a more pronounced and dramatic statement.
3. Color and Pattern:
Let your creativity shine through your fabric choices. Play with bold colors, vibrant patterns, or simple stripes to set the desired ambiance. Consider the existing vibe of your porch and the surrounding outdoor area for a cohesive and visually appealing look.
Installation Tips:
1. Framing:
For a polished appearance, consider building a simple wooden frame to stretch the fabric over. This not only creates a taut surface but also prevents sagging over time, ensuring a neat and clean look.
2. Hardware:
Choose sturdy staples, hooks, or Velcro strips suitable for attaching the fabric to the ceiling. Opt for rust-proof options to ensure longevity, especially in outdoor environments where exposure to the elements is inevitable.
3. Drainage:
Ensure your fabric installation allows for proper drainage to prevent water pooling and the growth of mildew. Consider incorporating small vents or leaving overhangs to facilitate water runoff, keeping your porch ceiling dry and pristine.
4. Seasonal Changes:
If you experience distinct seasons, choose fabrics that are easy to detach and store. This flexibility allows you to switch up the look effortlessly, adapting to seasonal changes or your evolving style preferences.
Beyond the Ceiling:
1. Drapes and Swags:
Extend the magic of your chosen fabric by incorporating drapes or swags along the sides of your porch. This not only enhances the visual appeal but also creates a more enclosed and intimate feel, perfect for cozy evenings outdoors.
2. Pillows and Throws:
Coordinate your fabric choice with outdoor pillows and throws for a cohesive and inviting space. This attention to detail ties the entire porch together, creating a harmonious and well-designed outdoor oasis.
Remember:
1. Safety:
Ensure your fabric installation is secure and won’t flap wildly in strong winds. Safety is paramount, and a well-secured installation ensures both visual appeal and durability.
2. Cleaning and Maintenance:
Choose fabrics that are easy to clean and maintain. Look for materials that can be wiped down or easily removed for washing, allowing you to keep your porch ceiling looking fresh and vibrant with minimal effort.
2. Bamboo Mats for a Tropical Twist Porch Ceiling
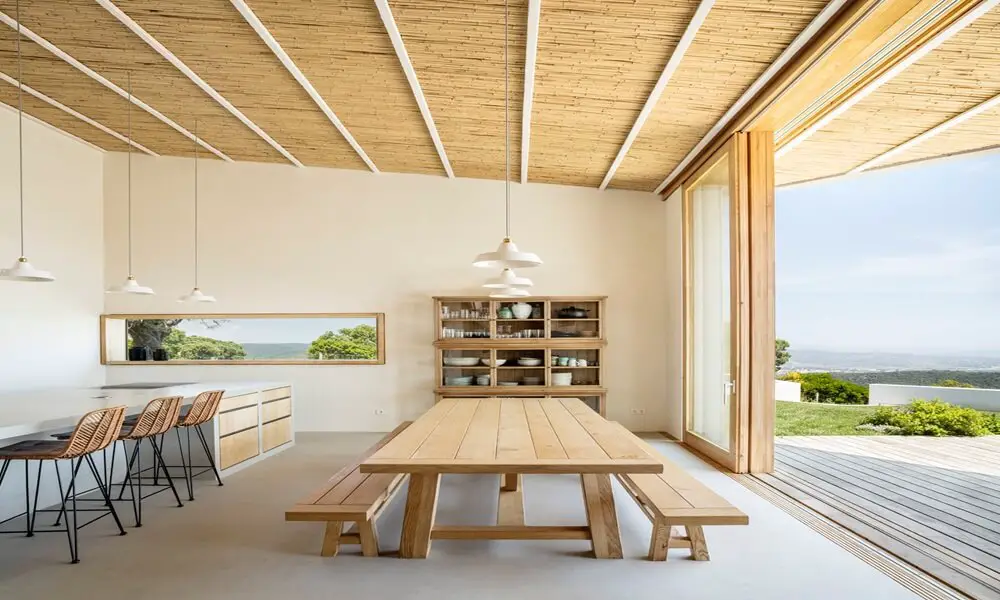
Escape to a tropical paradise without leaving your porch by incorporating bamboo mats. These inexpensive mats are not only easy to install but also infuse a relaxed, beachy vibe. Enhance the laid-back atmosphere with some potted plants and comfortable seating, and you’ll have your own little oasis without breaking the bank.
Let’s dive deeper into why bamboo mats are a fantastic choice and explore additional ideas to create your own personal oasis.
Bamboo Mat Choices:
1. Material:
Opt for high-quality bamboo mats treated with weather-resistant stains or sealants to ensure durability. Consider various forms such as woven panels, roll-up shades, or individual strips for diverse visual effects, allowing you to tailor the tropical vibe to your liking.
2. Texture and Color:
Natural bamboo provides a classic look, while darker stained finishes or carbonized mats can add a modern touch to your porch. Play with textures like flat panels or woven weaves for added visual interest, allowing you to customize the atmosphere of your oasis.
3. Installation:
Attaching bamboo mats to your ceiling is a straightforward process. Utilize screws, staples, or construction adhesive for a secure hold. For a more polished appearance, consider using a frame, or leave them free-hanging for a laid-back and casual vibe that complements the tropical theme.
Tropical Touches:
1. Greenery:
Enhance the tropical feel with hanging plants, potted palms, or climbing vines. Bamboo planters further contribute to a natural touch, creating a lush and vibrant porch environment.
2. Lighting:
Drape string lights across the ceiling or hang lanterns from beams to create a warm and inviting glow during evenings. Opt for solar-powered lights to add an eco-friendly touch that aligns with the tropical theme.
3. Furniture:
Choose porch furniture crafted from natural materials like rattan, wicker, or wood to maintain the organic feel. Infuse playful touches with colorful cushions and throws, creating a comfortable and visually appealing seating area.
Beyond the Ceiling:
1. Walls and Screens:
Extend the tropical theme by using bamboo mats on walls or as privacy screens on your porch. This not only adds continuity to the aesthetic but also defines your outdoor space, creating a cohesive and inviting atmosphere.
2. Flooring:
Woven bamboo mats can serve as a unique and textured addition to your porch floor. Use smaller mats as accent rugs or piece together larger ones to create a distinctive woven floor covering that adds warmth and character.
Remember:
1. Maintenance:
Bamboo mats, like any material, require occasional cleaning to remove dust and debris. Regularly inspect for signs of wear and tear or water damage, ensuring the longevity of your tropical-inspired porch.
2. Ventilation:
When using bamboo on your ceiling, prioritize proper ventilation to prevent moisture buildup and potential mold growth. This ensures that your porch remains a fresh and healthy space.
3. Painted Plywood Masterpiece Porch Ceiling
Unleash your inner artist with a painted plywood masterpiece. This DIY-friendly option allows you to turn your porch ceiling into a unique work of art. Choose colors that complement your porch’s theme, and with a few stencils or some freehand designs, you can create a personalized masterpiece that adds character and charm.
Here are some additional thoughts to guide and inspire your artistic vision:
Plywood Prep:
1. Choose the Right Plywood:
Opt for exterior-grade plywood with a smooth finish to ensure the best painting results. Prioritize plywood that is resistant to outdoor elements. Prime the plywood with a high-quality exterior primer to prevent warping and to create a surface that readily accepts paint.
2. Size and Cuts:
Consider the dimensions of your porch ceiling and cut the plywood panels accordingly. Precutting indoors allows for a more controlled environment, ensuring accurate dimensions and facilitating a smoother painting process.
Design Brainstorming:
1. Theme:
Align your artwork with the overall style of your porch. Whether it’s coastal themes, bohemian patterns, geometric shapes, or whimsical murals, choose a theme that resonates with your aesthetic preferences and complements your outdoor space.
2. Color Palette:
Select colors that harmonize with your existing furniture, decor, and the surrounding outdoor environment. Whether you opt for bold pops of color or a soothing monochromatic scheme, the right color palette enhances the visual impact of your masterpiece.
3. Stencils or Freehand?:
Decide on your approach. Stencils are excellent for beginners, providing structure and precision. On the other hand, freehand painting offers more artistic freedom. Consider combining both techniques for a dynamic and layered effect.
Painting Tips:
1. Primer and Base Coat:
Start with a weather-resistant exterior primer to prepare the surface. Follow this with a solid base coat in your chosen color. This foundational layer ensures a smooth canvas for your artwork and enhances the longevity of the paint.
2. Stencils:
If using stencils, choose sturdy, reusable ones for crisp lines and repetitive patterns. Secure them with painter’s tape and use a stencil brush to apply the paint, ensuring precision and consistency in your design.
3. Freehand Painting:
For freehand painting, lightly sketch your design on the plywood beforehand. Experiment with various brush sizes and techniques like stippling, blending, and outlining to create depth and texture in your masterpiece.
4. Sealer:
Once your artwork is complete, protect it with a clear exterior sealer. This additional layer enhances durability, providing weather resistance and preserving the vibrancy of your painted masterpiece over time.
Beyond the Ceiling:
1. Coordinating Accents:
Integrate your painted plywood ceiling with the rest of your porch decor. Extend the color scheme or patterns to accent pieces like flower boxes, furniture details, or even throw pillows. This creates a cohesive and visually engaging outdoor space.
2. Lighting:
Highlight your artwork with strategically placed lights. Consider upward-facing sconces or pendant lights to provide dramatic illumination, showcasing your creation during both day and night.
4. String Lights and Fabric Elegance Porch Ceiling
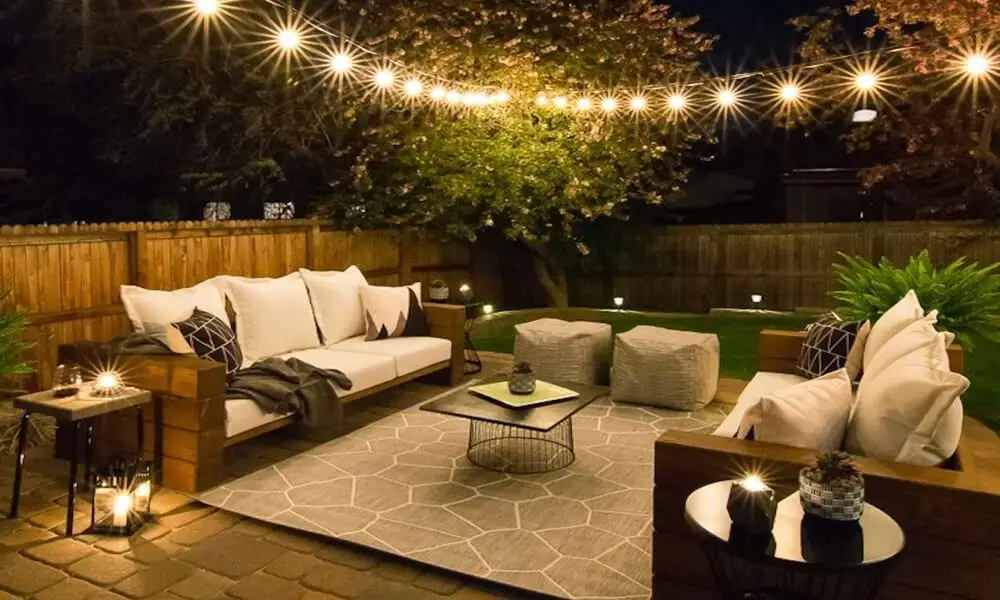
For a touch of enchantment, consider weaving string lights through light, sheer fabric. Drape the fabric between the ceiling, and let the soft glow of the lights create a magical ambiance. It’s a simple yet effective way to add warmth and elegance to your porch, creating a perfect setting for cozy evenings.
Here are some additional thoughts to guide you in creating your own magical outdoor oasis:
Fabric Choices:
1. Transparency:
Opt for lightweight, sheer fabrics like voile, organza, or chiffon. These fabrics allow the soft glow of the lights to shimmer through, creating a dreamy and ethereal effect that transforms your porch into a magical haven.
2. Color and Texture:
Consider the mood you want to evoke. White or cream fabrics offer a classic and timeless look, while pastel hues or fabrics with metallic threads can add a whimsical touch. To enhance visual interest, explore textured fabrics like gauze or linen that can contribute to the overall enchantment.
3. Hanging Method:
Drape the chosen fabric directly across the ceiling and secure it with hooks, clips, or tension rods. For a more defined and polished appearance, consider creating a simple frame to stretch the fabric taut, enhancing the overall aesthetic.
String Light Selection:
1. Warmth:
Choose fairy lights or LED string lights with a warm white or amber glow to create a cozy and inviting atmosphere. If you prefer a modern feel, cool white lights can also work well. The warmth of the lights contributes significantly to the overall ambiance.
2. Power Source:
Consider the power source for your lights. Solar-powered lights are an eco-friendly option, allowing you to harness the energy of the sun. If you desire more brightness and control, plug-in lights are a reliable choice. Additionally, explore lights with timer functionalities for added convenience and efficiency.
3. Spacing and Pattern:
Experiment with the spacing and arrangement of the lights to create different effects. Whether you prefer cascading strands, gently draped lines, or even intricate woven patterns, the placement of the lights adds charm and uniqueness to your design.
Additional Enhancements:
1. Greenery:
Introduce trailing plants or potted ferns to enhance the natural touch and amplify the magical ambiance. The combination of greenery with the soft glow of lights creates a captivating and organic atmosphere.
2. Lanterns or Candles:
Combine the string lights with lanterns or candles for a layered lighting effect. The interplay of different light sources adds depth and sophistication to your outdoor oasis, especially during the evening hours.
3. Comfortable Seating:
Arrange cozy chairs or swings underneath the fabric canopy to create a relaxing haven. The combination of comfortable seating and the enchanting overhead display invites you and your guests to linger and enjoy the serene atmosphere.
Remember:
1. Fabric Safety:
Prioritize safety by choosing flame-retardant fabrics, especially if you plan to incorporate candles or open flames. This ensures a secure and worry-free environment.
2. Weatherproofing:
If your porch is exposed to the elements, opt for weather-resistant fabrics and lights. This ensures that your enchanting setup remains resilient against varying weather conditions.
3. Cleaning and Maintenance:
Regularly clean the fabric and lights to maintain their beauty and prevent dust buildup. Keeping both components in pristine condition ensures that your magical outdoor oasis remains inviting and visually stunning.
5. Pallet Wood Rusticity Porch Ceiling
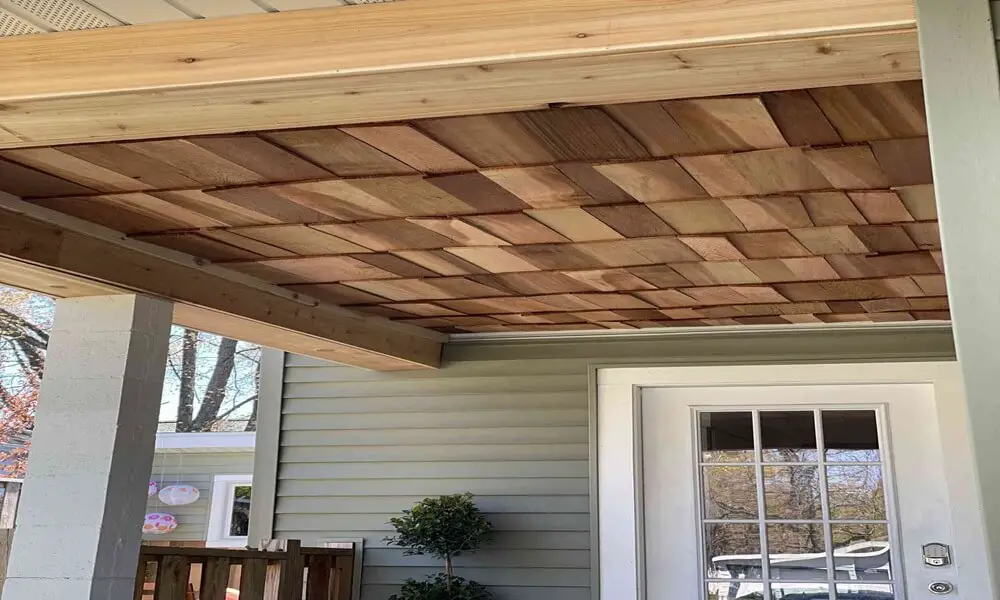
Give your porch a rustic touch by upcycling pallets. Not only is this option eco-friendly, but it’s also budget-conscious. Stain or paint the wood to match your style, and watch as your porch transforms into a charming, country-inspired retreat. Add some comfortable cushions and throws for the perfect cozy setting.
Here are additional insights to guide you in embracing this earthy design approach:
Pallet Prep:
1. Disassembly and Selection:
Choose robust pallets crafted from hardwood, such as oak or maple. Carefully disassemble them, removing any nails or staples, using a pry bar or hammer. Smooth out imperfections and splinters by sanding the wood to prepare it for your porch project.
2. Cleaning and Treatment:
If the wood appears weathered or dirty, clean it with a mild detergent and let it dry thoroughly. Consider pre-treating the pallet wood with a weather-resistant sealant to safeguard against moisture and sun damage, ensuring longevity.
Design and Installation:
1. Layout and Pattern:
Embrace creativity with the layout of your pallet planks. Stack them horizontally for a classic look, experiment with a chevron pattern for visual interest, or leave gaps for a peek-through ceiling effect. The design possibilities are limitless.
2. Attachment Methods:
Secure the pallet wood planks to your porch ceiling using screws, nails, or construction adhesive. Ensure proper ventilation between the wood and the ceiling to prevent moisture buildup, preserving the integrity of both the wood and your porch structure.
3. Finishing Touches:
Stain or paint the wood to match your desired aesthetic. Darker stains like walnut or espresso can evoke a rustic farmhouse vibe, while lighter shades such as white or grey can brighten the space. The finish adds the final touch to your porch’s overall atmosphere.
Enhancing the Rustic Charm:
1. Greenery:
Introduce potted herbs, hanging plants, or climbing vines to add a touch of nature, enhancing the earthy feel of your rustic porch. The combination of greenery with the wooden ceiling creates a harmonious and inviting outdoor environment.
2. Furniture and Decor:
Opt for porch furniture crafted from natural materials like wicker, rattan, or wood to complement the rustic aesthetic. Complete the look with rustic accents such as lanterns, metal signs, or vintage crates, creating a cohesive and visually appealing outdoor space.
3. Cozy Textiles:
Add warmth and comfort to your rustic porch with woven blankets, chunky throws, and patterned cushions. These cozy textiles not only enhance the comfort but also contribute to the inviting atmosphere.
Beyond the Ceiling:
1. Walls and Accents:
Extend the rustic theme beyond the ceiling by incorporating pallet wood on accent walls, planters, or even in crafting DIY furniture pieces. Consistency in design elements ties the entire space together seamlessly.
2. Flooring:
Consider using reclaimed wood pallets or weathered planks for a rustic flooring option. This additional touch creates a cohesive and harmonious look, grounding the entire porch in rustic charm.
Remember:
1. Safety:
Ensure your pallet wood installation is secure, and the planks are free from any harmful chemicals or residues. Prioritize the safety and well-being of your porch’s occupants.
2. Maintenance:
Regularly inspect the wood for any signs of warping or damage, and apply protective sealant as needed. Maintenance ensures the continued beauty and durability of your rustic porch ceiling.
6. Stenciled Designs for Personalized Flair Porch Ceiling
Add a touch of personality with stenciled designs. Whether you opt for geometric patterns or intricate motifs, stenciled designs provide a budget-friendly way to make your porch ceiling uniquely yours. Experiment with different colors to match your overall aesthetic and create a visually appealing focal point.
Here are some additional insights to guide you in designing and executing your stenciled masterpiece:
Choosing Your Stencil:
1. Style:
Consider your porch’s overall aesthetic and select a stencil that complements it seamlessly. Whether you lean towards geometric patterns for a modern touch, floral motifs for a whimsical vibe, or nature-inspired designs for a serene atmosphere, choose a style that resonates with your porch’s personality.
2. Complexity:
Tailor the complexity of your stencil choice to your comfort level and expertise in stenciling. If you’re new to the technique, start with simpler designs, gradually progressing to more intricate patterns as you gain confidence. Don’t hesitate to layer multiple stencils for added depth and complexity.
3. Material:
Opt for reusable stencils made from durable materials like plastic, Mylar, or vinyl. The longevity and versatility of these materials make them ideal for multiple stenciling projects, ensuring a reliable tool for your creative endeavors.
Preparation and Technique:
1. Surface Prep:
Ensure your porch ceiling is thoroughly clean, free of dirt, dust, and cobwebs. For optimal results, apply a fresh coat of paint in a neutral color as a base, providing a pristine canvas for your stenciled masterpiece.
2. Securing the Stencil:
Use painter’s tape or repositionable spray adhesive to securely affix the stencil to the ceiling, preventing any undesired paint leaks. A well-secured stencil is crucial for achieving crisp and defined patterns.
3. Paint Application:
Select a foam roller or stencil brush for applying the paint. Apply a light touch, offloading excess paint before dabbing onto the stencil to prevent bleeding. Experiment with different colors and layering techniques to create a uniquely captivating design.
4. Cleaning Up:
Carefully remove the stencil while the paint is still wet. Gently clean any paint residue from both the stencil and your ceiling, ensuring a pristine finish for your stenciled design.
Adding Finishing Touches:
1. Highlighting the Design:
For added definition, use contrasting trim paint to outline the stenciled patterns. This simple yet effective step enhances the visual impact of your artwork.
2. Coordinating Accents:
Create a cohesive look by tying your stenciled ceiling into the rest of your porch decor. Choose throw pillows, lanterns, or outdoor rugs with matching colors or patterns, ensuring a harmonious and inviting atmosphere.
3. Lighting:
Experiment with lighting to accentuate your artwork. Upward-facing sconces or fairy lights strategically placed can highlight the details, creating a warm ambiance and showcasing your stenciled creation.
Beyond the Ceiling:
1. Walls and Furniture:
Extend the stenciling theme to accent walls, furniture pieces, or even planters for a coordinated and visually appealing overall look. Consistency in design elements across various porch elements enhances the entire space.
2. Floor Patterns:
Consider adding stenciled designs to your porch floor for an extra creative flair. Whether it’s geometric patterns or colorful borders, a stenciled floor contributes to a dynamic and inviting porch.
Remember:
1. Practice Makes Perfect:
If you’re new to stenciling, practice on a scrap piece of wood or cardboard before tackling your ceiling. This ensures confidence and precision in your stenciling technique.
2. Clean Stencils:
Regularly clean your stencils to maintain sharp lines and consistent results. A clean stencil is essential for achieving the desired patterns and ensuring the success of your stenciling projects.
3. Seal it Up:
For added protection, apply a clear exterior sealant to your stenciled design, especially if exposed to the elements. This protective layer enhances durability, allowing your stenciled artwork to withstand outdoor conditions and maintain its allure over time.
7. Recycled Materials for Eco-Chic Porch Ceiling
Go green without breaking the bank by using recycled materials for your porch ceiling. Reclaimed wood or repurposed metal not only adds a touch of eco-chic to your space but also tells a story. Embrace the imperfections of these materials for a truly one-of-a-kind porch ceiling that’s as unique as your home.
Here are additional insights to guide you in embracing the magic of repurposed treasures:
Reclaimed Wood Wonders:
1. Sourcing Treasures:
Embark on a treasure hunt for reclaimed wood at salvage yards, demolition sites, or even old barns and fences. Seek out weathered oak, barn wood, or shiplap to infuse rustic charm into your porch ceiling.
2. Cleaning and Preparation:
Thoroughly clean the reclaimed wood to eliminate dirt, debris, and any potential harmful residues. Sand away imperfections while considering leaving some natural markings for an authentic and character-rich appearance.
3. Installation Options:
Explore various installation methods for the reclaimed wood planks. Nail them directly to your ceiling for a raw, rustic look, create a shiplap or tongue-and-groove pattern for a more refined aesthetic, or fashion rustic beams for an architectural touch.
4. Finishing Touches:
Apply a clear sealant to protect the wood from the elements while preserving its innate beauty. If desired, stain or paint the wood to achieve a specific aesthetic that complements your overall porch design.
Repurposed Metal Magic:
1. Metal Possibilities:
Consider corrugated metal panels, vintage tin tiles, or even repurposed old shutters to introduce an industrial or vintage touch to your porch ceiling.
2. Preparation and Painting:
Thoroughly clean the metal to remove any rust or dirt. Depending on your desired look, leave the metal bare for an industrial vibe, paint it a bold color for a statement piece, or apply a metallic finish for a touch of glamour.
3. Installation Considerations:
Securely attach the metal to your ceiling using screws or rivets. Ensure proper ventilation to prevent moisture buildup behind the panels, maintaining the structural integrity of your porch.
Beyond the Ceiling:
1. Accents and Furniture:
Extend the recycled theme throughout your porch decor by incorporating metal or wood accents. Integrate repurposed chairs, hanging planters, or light fixtures crafted from salvaged materials to create a cohesive and environmentally conscious design.
2. Greenery:
Balance the industrial or vintage feel of the recycled materials by introducing potted plants or climbing vines. Nature’s touch softens the overall aesthetic, creating a harmonious blend of organic and repurposed elements.
Remember:
1. Safety First:
Ensure that your recycled materials are structurally sound and free of any harmful chemicals or rust. Prioritize the safety and well-being of your porch occupants.
2. Weatherproofing:
Select materials and finishes that can withstand the elements in your specific climate. This ensures the longevity and resilience of your recycled porch design.
3. Embrace Imperfections:
Celebrate the natural markings and unique characteristics of recycled materials. These imperfections contribute to the charm and character of your porch design, making it a true reflection of sustainable and mindful living.
8. Corrugated Metal Panels for Modern Edge Porch Ceiling
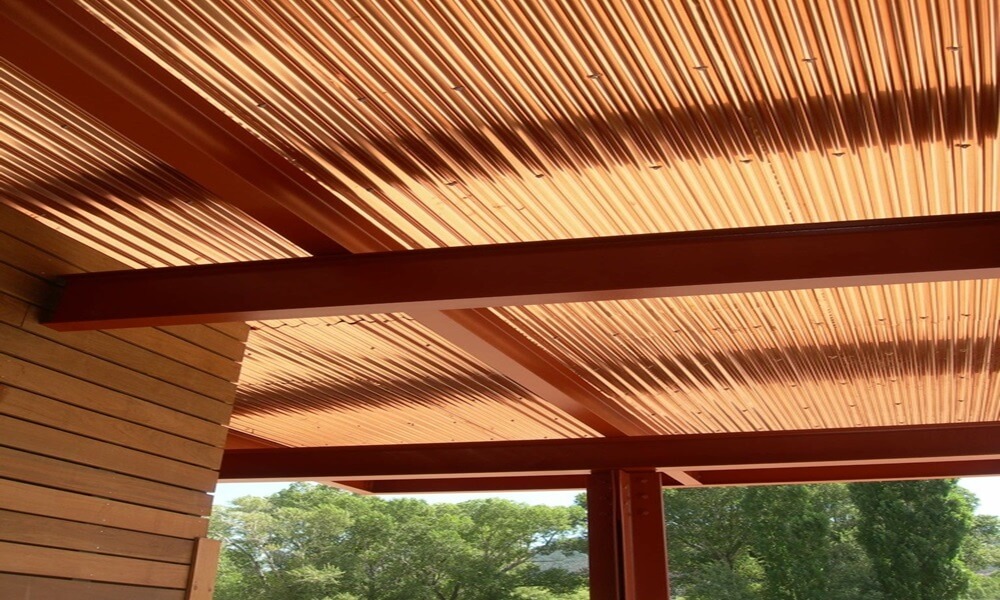
For a modern and industrial aesthetic, consider corrugated metal panels. Budget-friendly and durable, these panels add a contemporary touch to your porch. Their versatility allows for various finishing options, making them suitable for both urban and suburban settings.
here are additional considerations:
Metal Panel Choices:
1. Material:
Opt for galvanized steel or aluminum panels due to their durability and weather resistance. Choose pre-painted options for added convenience or unpainted panels for a more industrial vibe.
2. Color and Finish:
For a modern look, popular color choices include black, gray, and silver. Alternatively, make a statement with bolder colors like red or blue. Weathered or distressed finishes can add character to the overall aesthetic.
3. Corrugation Size:
Fine or small corrugations offer a sleek and contemporary look, while larger corrugations provide a bolder visual impact. Tailor the size to achieve the desired effect.
Installation Tips:
1. Subframing:
Create a polished finish by building a simple wooden subframe to attach the panels. This ensures even spacing and a seamless appearance, enhancing the overall visual appeal.
2. Attachment:
Secure the panels using galvanized screws or rivets, ensuring a firm attachment to the ceiling or subframe. Proper ventilation behind the panels is crucial to prevent moisture buildup and rust.
3. Seams and Edges:
Consider overlapping the panels slightly for a seamless appearance. Trim the edges for a cleaner finish, adding to the overall polished look of the porch ceiling.
Enhancing the Modern Vibe:
1. Lighting:
Play with modern lighting options such as track lights, pendant lamps, or sconces to illuminate the ceiling and create a dramatic effect. Thoughtful lighting enhances the contemporary feel of the space.
2. Furniture and Decor:
Select sleek and modern furniture crafted from materials like metal, glass, or natural wood. Minimalist accents, including throw pillows, planters, and wall art, contribute to the overall modern aesthetic.
3. Greenery:
Softening the industrial feel with greenery is key. Introduce potted succulents, cacti, or air plants to bring a touch of nature to the porch, creating a balanced and inviting atmosphere.
Beyond the Ceiling:
1. Walls and Accents:
Extend the corrugated metal theme by incorporating it into accent walls, planters, or even covering light fixtures. This creates a cohesive design throughout the porch.
2. Flooring:
Consider concrete or polished wood flooring for a seamless transition from the ceiling to the ground. Consistency in materials enhances the modern and unified look of the porch.
Remember:
1. Safety:
Ensure secure installation with firmly attached panels to prevent wind damage. Prioritize safety to maintain the longevity of the porch update.
2. Maintenance:
Corrugated metal requires minimal maintenance. Regularly inspect for signs of rust or damage, applying touch-up paint as needed to preserve the porch’s modern appeal.
3. Soundproofing:
Be mindful that corrugated metal can amplify sound. If noise is a concern, consider adding insulation behind the panels to mitigate any potential disruptions.
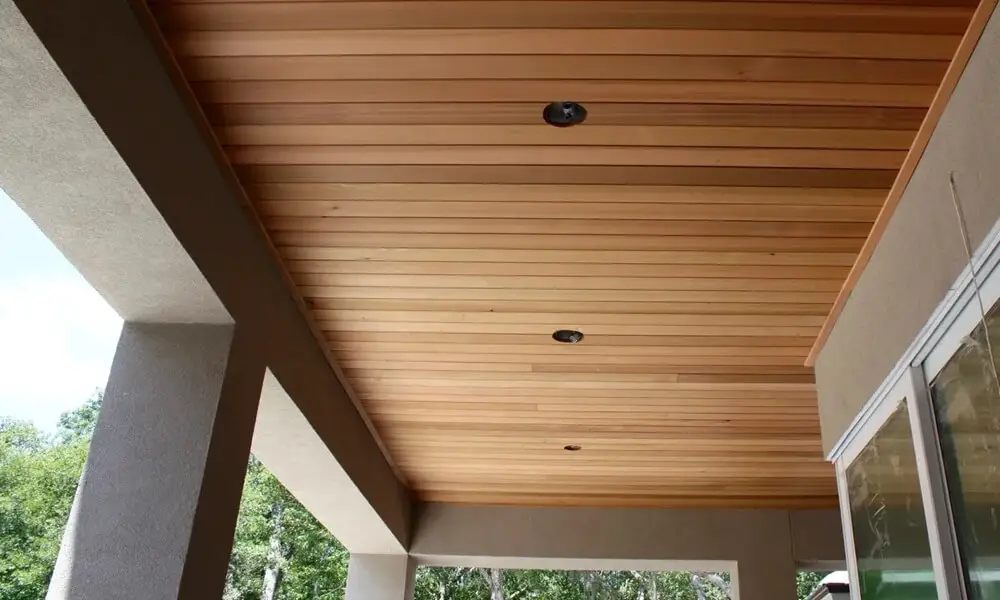
9. PVC Panels for Low Maintenance Elegance Porch Ceiling
Achieve a polished look without the high costs by installing PVC panels. These budget-friendly panels are resistant to moisture and easy to maintain. Choose from various styles to match your porch’s aesthetic, and enjoy an elegant ceiling without the hassle of constant upkeep.
Here are additional insights to guide you towards achieving the perfect look:
PVC Panel Choices:
1. Style and Finish:
Explore the diverse range of PVC panels available, from smooth and sleek designs to textured and wood-grain finishes. Opt for classic white for a clean appearance or choose natural wood tones to create a warm and inviting ambiance. Consider panels with metallic or faux tile finishes for a touch of glamour.
2. Size and Installation:
PVC panels come in various sizes, allowing you to create a seamless look or add dimension with smaller panels. Installation is typically straightforward, utilizing tongue-and-groove systems or interlocking edges.
3. Moisture Resistance:
PVC’s notable advantage lies in its exceptional resistance to moisture and weather conditions, making it an ideal choice for outdoor spaces like porches.
Achieving Elegance:
1. Lighting:
Enhance the elegance of your PVC ceiling with carefully chosen lighting. Pendant lights, recessed lighting, or strategically placed sconces can contribute to a sophisticated ambiance. Opt for warm white bulbs to create a welcoming atmosphere.
2. Moldings and Trims:
Elevate the overall look by adding decorative moldings or trim around the edges of the PVC panels. This not only enhances the aesthetics but also provides a more finished and refined feel to your porch.
3. Color Accents:
Introduce pops of color through well-chosen furniture, vibrant throw pillows, or outdoor rugs. This adds character and complements the neutral tones of the PVC panels, creating a visually appealing and harmonious space.
Beyond the Ceiling:
1. Walls and Accents:
Extend the elegance of PVC panels by incorporating them into accent walls or creating outdoor privacy screens. This ensures a cohesive design throughout your porch, tying together various elements seamlessly.
2. Flooring:
For a seamless transition from the ceiling to the ground, consider natural wood decking, elegant tile, or durable concrete flooring. The continuity in materials enhances the overall aesthetic appeal of your porch.
Remember:
1. Ventilation:
Ensure proper ventilation behind the PVC panels to prevent moisture buildup and potential mold growth. This step is crucial for maintaining the longevity and pristine condition of your porch ceiling.
2. Maintenance:
Enjoy the low-maintenance benefits of PVC panels by simply wiping them down with a damp cloth to keep them clean. This hassle-free approach ensures your porch retains its elegant appearance effortlessly.
3. Sustainability:
While PVC is durable, it may not be the most eco-friendly material. If sustainability is a priority, explore recycled or natural alternative options for your porch ceiling to align with environmentally conscious choices.
10. Mural Ceilings for Artistic Sophistication Porch Ceiling
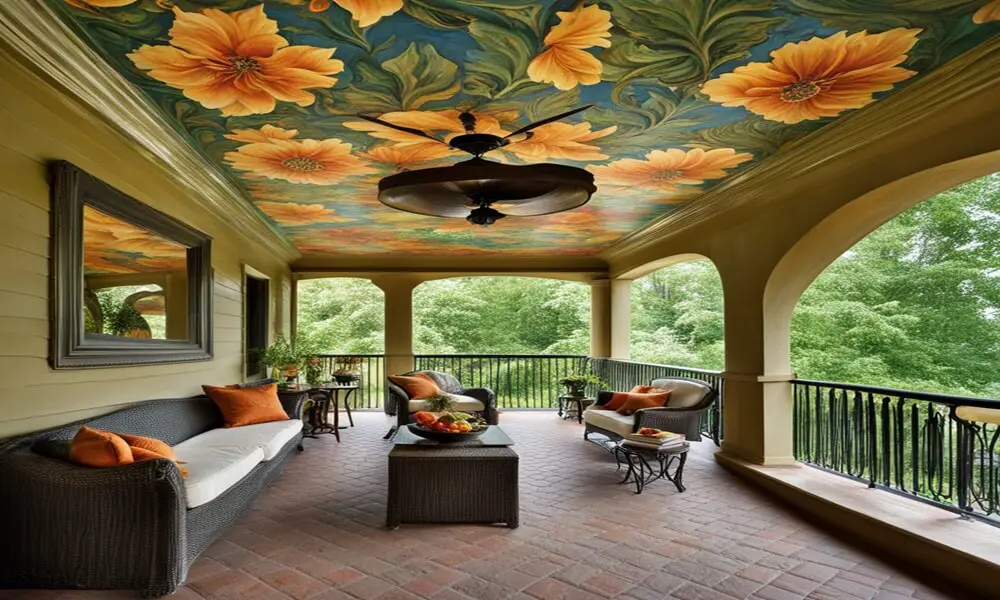
Transform your porch ceiling into a gallery with mural ceilings. Whether it’s a scenic landscape or a vibrant abstract design, mural ceilings bring an artistic sophistication to your outdoor space. Choose a theme that complements your porch’s style and let your creativity shine, turning your porch into a true masterpiece.
Here are additional insights to help you turn your creative vision into a breathtaking reality:
Choosing Your Mural Theme:
1. Style:
Align your mural with your porch’s overall aesthetic. Consider rustic landscapes for farmhouse vibes, geometric patterns for a modern touch, or whimsical florals for a romantic feel.
2. Color Palette:
Choose colors that harmonize with your existing furniture, decor, and outdoor surroundings. Opt for bold pops of color for a statement or a cohesive palette for enhanced harmony.
3. Nature-Inspired:
Bring the outdoors in with murals depicting landscapes, starry skies, or serene gardens, infusing your porch with a natural and tranquil ambiance.
4. Abstract Expression:
Let your creativity flow with abstract geometric shapes, playful patterns, or textured brushstrokes, adding a unique and modern touch to your porch.
Finding Your Artist:
1. Professional Muralists:
Hire a professional muralist for a polished and guaranteed stunning result, ensuring your porch becomes an artistic masterpiece.
2. DIY Approach:
For the artistically inclined, take on the mural yourself, allowing complete creative control and personalization to reflect your unique style.
3. Community Artists:
Explore local art schools or community projects for student artists eager to paint murals at an affordable price, fostering community engagement and support.
Preparation and Execution:
1. Surface Prep:
Ensure a clean, smooth ceiling free of cracks or imperfections by applying a primer for better paint adhesion.
2. Projecting or Sketching:
Project your chosen design onto the ceiling or lightly sketch it in pencil for guidance, ensuring the mural aligns seamlessly with your porch.
3. Painting Techniques:
Utilize weather-resistant exterior paints and appropriate brushes for different details and textures. Employ stencils for repetitive patterns or masking tape for crisp lines.
4. Sealing:
Protect your masterpiece with a clear exterior sealant, ensuring durability and resistance against varying weather conditions.
Enhancing the Artistic Atmosphere:
1. Lighting:
Highlight the mural details with upward-facing sconces or string lights, creating a magical ambiance that enhances the artistic allure.
2. Furniture and Decor:
Select furniture pieces that complement the mural’s theme, with natural wood or minimalist designs enhancing the artistic focus.
3. Greenery:
Introduce potted plants or hanging vines for a touch of nature, providing organic balance against the painted art and contributing to a vibrant atmosphere.
Beyond the Ceiling:
1. Accent Walls:
Extend the mural theme onto accent walls around your porch, creating a more immersive experience throughout the entire space.
2. Flooring:
Opt for natural materials like wood or stone to complement the artistic vibe of the mural, ensuring a cohesive and visually striking porch.
Remember:
1. Weatherproofing:
Choose paints and sealants suitable for outdoor conditions, safeguarding your mural against sun, rain, and wind damage for long-lasting beauty.
2. Scale and Perspective:
Consider the size and shape of your porch ceiling when choosing your mural design. Practice sketching beforehand to ensure a harmonious fit.
3. Safety:
Prioritize safety measures when using scaffolding or ladders, and consider working with a partner to ensure a secure and enjoyable mural-painting experience.
Conclusion
In the grand symphony of patio design, the often overlooked patio ceiling emerges as a canvas for limitless creativity. Throughout this exploration of various patio ceiling ideas, we’ve explored a variety of possibilities, each offering unique personality to your outdoor space.
As you begin your porch improvement journey, remember that these ideas are just a starting point. Your terrace is a reflection of your personality, a haven waiting to be transformed into a space that resonates with you.