How to Build a Porch Swing Bed
Building a porch swing bed might seem like a sizable project, but with the right guidance, it can be a straightforward and enjoyable experience. In this article, I’ll guide you through the process of constructing a twin-size porch swing bed. Whether you’re a seasoned woodworker or a novice, this step-by-step guide will help you create a cozy spot for napping, lounging, or simply enjoying the outdoors.
Materials Needed

Before diving into the construction, let’s gather the necessary materials. Here’s what you’ll need for a twin-size porch swing bed:
Materials:
- 5 x 1x4x8 boards
- 1 x 1x6x8 boards
- 6 x 2x4x10 boards
- 2 x 2x6x8 boards (or cut from 2x4s)
- 3/4″ plywood sheet (optional, for thin mattresses)
- Screws (timber screws recommended)
- Outdoor stain and sealant
- Rope kit with 4 ropes and eye screws
Additional Notes on Materials:
- Consider untreated pine or spruce for covered porch use.
- For enhanced weather resistance, opt for treated cedar, redwood, or a weather-resistant alternative.
- If two by twos are needed, they can be purchased pre-cut or cut from two by fours using a table saw.
Building the Seat Frame: Step by Step Guide
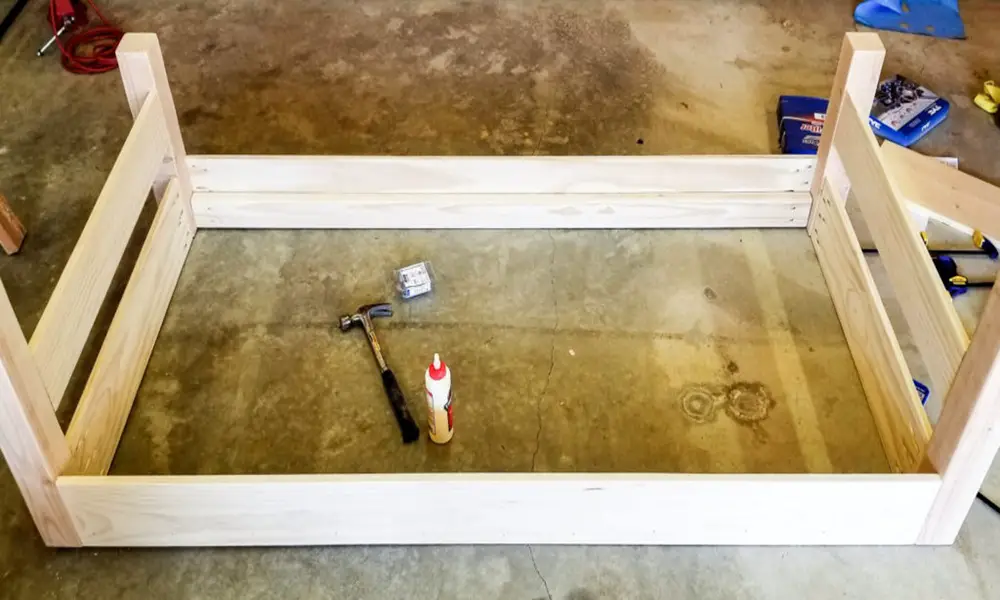
1. Assembling the Seat Frame
Materials Needed:
- Two 2×6 boards
- Two 2×4 boards
- 2 7/8-inch timber screws
Procedure:
- Select and Trim Boards: Begin by choosing two 2×6 boards for the front and back and two 2×4 boards for the sides. Trim these boards to your desired length.
- Secure with Timber Screws: Use 2 7/8-inch timber screws to securely attach the trimmed boards. Ensure they are tightly joined for a robust seat frame.
2. Adding Corner Support
Materials Needed:
- 2×4 boards
- Timber screws or regular wood screws
Procedure:
- Attach Corner Supports: Position 2×4 boards at each corner of the seat frame. Secure them in place using either timber screws or regular wood screws. This adds stability to the overall structure.
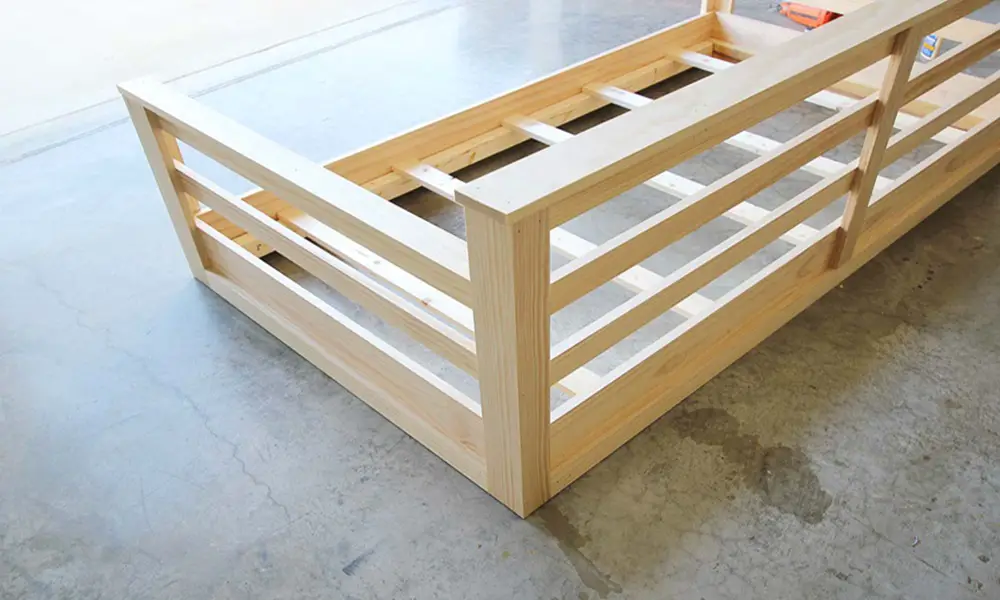
3. Two by Twos and Slats
Materials Needed:
- Two by twos
- Pocket hole jig and screws
- 1×4 slats
- Exterior wood screws
Procedure:
- Inset Two by Twos: Create additional support by inserting two by twos between the two by fours. Utilize a pocket hole jig and screws for a secure fit.
- Attach Slats: Install 1×4 slats, placing five on each side and ten across the back. Use exterior wood screws for a durable connection.
4. Armrest and Trim
Materials Needed:
- Two by fours
- 1×6 board
Procedure:
- Armrest Placement: Affix two by fours along the top edge of the seat frame to serve as comfortable armrests.
- Trim with 1×6 Board: Trim the sides with a 1×6 board to match the thickness of the front. This not only adds a polished look but also conceals any visible screws.
5. Adding Support for the Mattress
Materials Needed:
- Two by fours
- Pocket hole jig and screws
- Plywood (optional)
Procedure:
- Bottom Support: Reinforce the bottom of the seat frame by adding two by fours. Use a pocket hole jig and screws for secure attachment.
- Optional Plywood Support: Depending on the mattress type, consider placing a sheet of plywood for additional support. This is particularly beneficial for thin foam mattresses.
Finishing Touches: Elevate Your Porch Swing Bed
1. Runners for Ropes
Materials Needed:
- Two by fours
- Screws
Procedure:
- Positioning the Runners: Enhance the functionality of your porch swing bed by attaching two by fours along the bottom as runners. These will serve as the anchor points for the ropes.
- Secure with Screws: Using appropriate screws, firmly secure the two by fours to the underside of the seat frame. Ensure they are evenly spaced and aligned for optimal stability.
- Overhang Consideration: For aesthetic appeal and functionality, allow the two by fours to overhang each side of the swing bed by approximately six inches. This not only adds visual interest but also provides a practical platform for attaching the swing ropes.
2. Staining and Sealing
Materials Needed:
- Outdoor stain and sealant
- Applicator or brush
Procedure:
- Choosing the Right Stain: Select a high-quality outdoor stain and sealant suitable for the type of wood used in your porch swing bed. Consider the color that complements your outdoor space.
- Preparing the Surface: Ensure the wood surface is clean and free from any dust or debris. Sanding the surface lightly may be necessary for a smooth finish.
- Applying the Stain: Using an applicator or brush, evenly apply the outdoor stain to the entire porch swing bed. Pay attention to details, making sure to cover all nooks and crannies.
- Sealing the Wood: Once the stain has dried, apply a layer of sealant to protect the wood from the elements. This step is crucial for enhancing the longevity of your porch swing bed.
- Multiple Coats (Optional): For added durability, consider applying multiple coats of sealant. Follow the manufacturer’s recommendations for drying times between coats.
- Drying Period: Allow sufficient time for the stain and sealant to dry completely before using the porch swing bed. This ensures a beautiful, well-protected finish.
Personalizing Your Porch Swing Bed
Consider personalizing your porch swing bed further by adding cushions, throw pillows, or even a cozy blanket for extra comfort. The finishing touches not only protect your creation from the elements but also contribute to its overall aesthetic appeal. Now, sit back, relax, and enjoy your handcrafted porch swing bed in style!
Hanging the Swing: Turning Your Project into a Relaxing Oasis

1. Drilling Holes for Ropes
Materials Needed:
- Three-quarter-inch forstner bit
- Power drill
Procedure:
- Determining Hole Placement: Before drilling, carefully plan the position of the holes in the bottom two by fours. Ensure they align with the desired swing motion and are evenly spaced.
- Using the Forstner Bit: Attach the three-quarter-inch forstner bit to your power drill. This bit creates clean, precise holes for the ropes to pass through.
- Drilling the Holes: With the drill set at a low speed, gently drill through the bottom two by fours at the predetermined locations. Keep the drill straight to ensure the holes are perpendicular to the swing’s surface.
- Hole Depth: Drill to a depth that allows the ropes to pass through comfortably without compromising the strength of the two by fours.
- Cleaning Up: After drilling, clean any wood debris from the holes to ensure a smooth passage for the ropes.
2. Attaching Ropes
Materials Needed:
- Adjustable rope kit
Procedure:
- Selecting a Suitable Rope Kit: Choose an adjustable rope kit designed for hanging swings. These kits typically include durable ropes and adjustable mechanisms.
- Thread the Ropes: Thread the ropes through the holes in the bottom two by fours. Ensure that an equal length of rope hangs on either side for balance.
- Adjustable Mechanism: Utilize the adjustable mechanism provided in the kit to customize the length of the ropes. This step allows you to set the desired height for your porch swing.
- Securing Knots: Tie secure knots at the ends of the ropes after adjusting the length. Double-check the knots to ensure they are tight and safe.
3. Installing the Swing
Materials Needed:
- Eye screws
- Power drill
- Clips
Procedure:
- Locating Rafters: Use a stud finder to locate the ceiling rafters where you intend to hang the swing. Ensure that the rafters can support the weight of the swing and its occupants.
- Pre-Drilling Holes: Pre-drill holes into the identified rafters using a power drill. The holes should match the size of the eye screws.
- Installing Eye Screws: Screw the eye screws into the pre-drilled holes. Make sure they are securely fastened and can bear the weight of the swing.
- Attaching Clips: Connect the ropes from the swing to the eye screws using durable clips. These clips provide a secure connection while allowing for easy adjustment if needed.
- Ensuring Stability: Before fully enjoying your swing, give it a gentle test to ensure it’s stable and securely attached to the ceiling.
Now that your porch swing is installed, it’s time to kick back, relax, and enjoy the fruits of your labor. The gentle sway of the swing is sure to become a favorite spot for peaceful moments and serene afternoons.
You may also like:
Conclusion
Congratulations!! You have successfully made a twin size patio swing bed. Now you have the perfect place to relax and enjoy the outdoors. If you like this DIY project, leave a comment and subscribe for more interesting projects. Don’t forget to grab the plan at the link below and happy swinging!
FAQs
Can I use treated lumber for the entire project?
Yes, treated lumber is suitable for added weather resistance.
Do I need a pocket hole jig for this project?
While a pocket hole jig is useful, you can use regular or timber screws as an alternative.
Can I customize the dimensions for a smaller swing?
Absolutely, adjust the dimensions to fit your space and preferences.
Is the plywood bottom necessary for all mattresses?
It depends on the mattress type; a spring mattress may not require additional support.
Where can I find the rope kit used in the article?
The rope kit used can be found in the description below.