Install Garage Door Springs
When it comes to home maintenance, few tasks are as crucial as ensuring your garage door functions smoothly. One of the key components affecting its performance is the garage door spring. In this comprehensive guide, I’ll walk you through the complicated process of install garage door springs, providing the nuances, safety measures, and step-by-step instructions to empower you for a successful installation.
Understanding the Risks: Why Hire a Professional?
The Perils of DIY
Installing or replacing garage door springs involves inherent risks, primarily due to the tension these springs carry. This section sheds light on the dangers associated with attempting this task without professional expertise.
Preparation: Essential Steps Before You Begin
Disconnecting the Garage Door Opener
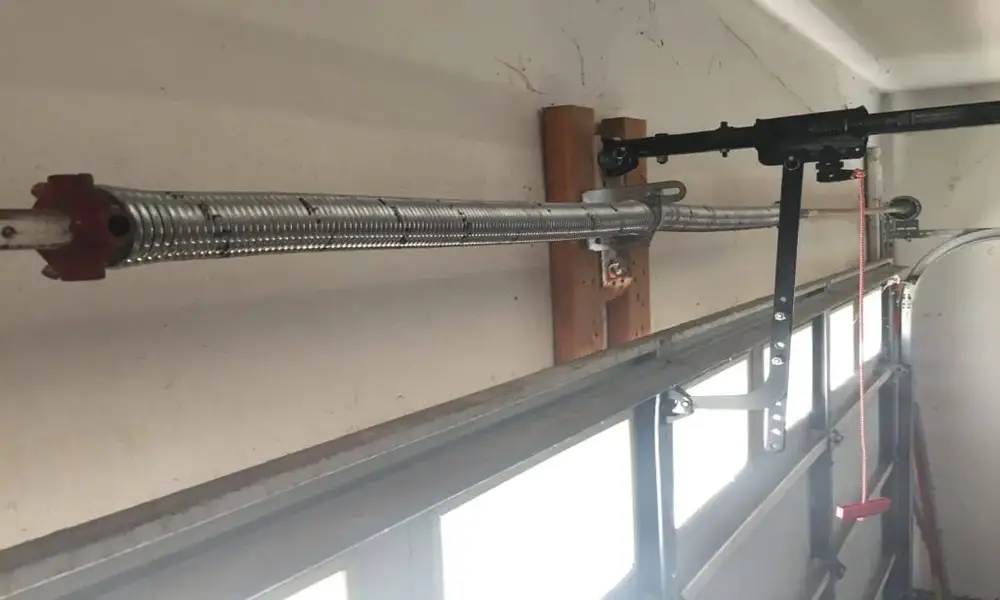
Before embarking on the garage door spring replacement journey, the first crucial step is disconnecting the garage door opener. This ensures a safe and unobstructed workspace, allowing you to focus on the task at hand without any interference. Follow these steps to execute this initial preparatory measure:
- Locate the garage door opener arm connected to the door.
- Identify the release mechanism or latch that holds the arm in place.
- Using appropriate tools, such as pliers or a wrench, carefully disconnect the arm from the door.
- Gently maneuver the arm to a position where it won’t impede your access to the springs.
This step not only guarantees a more convenient working environment but also minimizes the risk of accidental entanglements with the garage door opener components.
Releasing the Tension
Now that the garage door opener is disconnected, the next critical step is releasing the tension from the functional spring. This process involves the use of turning bars and wrenches, and it’s paramount to approach it with caution and a clear understanding of the tools involved. Follow these detailed instructions to safely release the tension:
- Acquire a set of turning bars and the appropriate wrenches (3/8 inch and 9/16 inch).
- Identify the cone with set screws on the functional spring. This is where the turning bars will be inserted.
- Insert one turning bar into the cone with set screws and take the tension off the spring.
- Place the second turning bar inside the first one and slowly release the pressure, transferring it to the second bar.
- Ensure your body is clear of the path of the bars and the tensioned spring to avoid accidents.
This careful unwinding process sets the stage for the subsequent steps in the garage door spring replacement procedure.
Executing the Replacement: Step-by-Step Guide
Unwinding the Springs
With the tension released, the next step involves unwinding the functional spring. This is a meticulous process that requires precision and attention to safety. Follow these detailed instructions to successfully unwind the spring:
- Using the turning bars, unwind the spring one quarter turn at a time.
- The number of turns required depends on the dimensions of the garage door. For an eight-foot door, it typically takes 32 quarter turns.
- Ensure the turning bars are fully seated in the cone, preventing any slippage during the unwinding process.
- Pay attention to any elongation of the spring during winding; this is a normal occurrence.
This step prepares the springs for the subsequent stages of the replacement process.
Loosening Set Screws
Loosening the set screws is a pivotal stage in preparing the spring for replacement. This step requires careful attention to detail and adherence to safety measures. Follow this step-by-step walkthrough to effectively loosen the set screws:
- Use the appropriate wrenches to turn the set screws counterclockwise.
- It’s not necessary to remove the set screws entirely; loosening them is sufficient.
- This step ensures that the force of the spring is centered for the next stages of the replacement process.
Carefully executed, this step sets the foundation for the seamless replacement of the garage door springs.
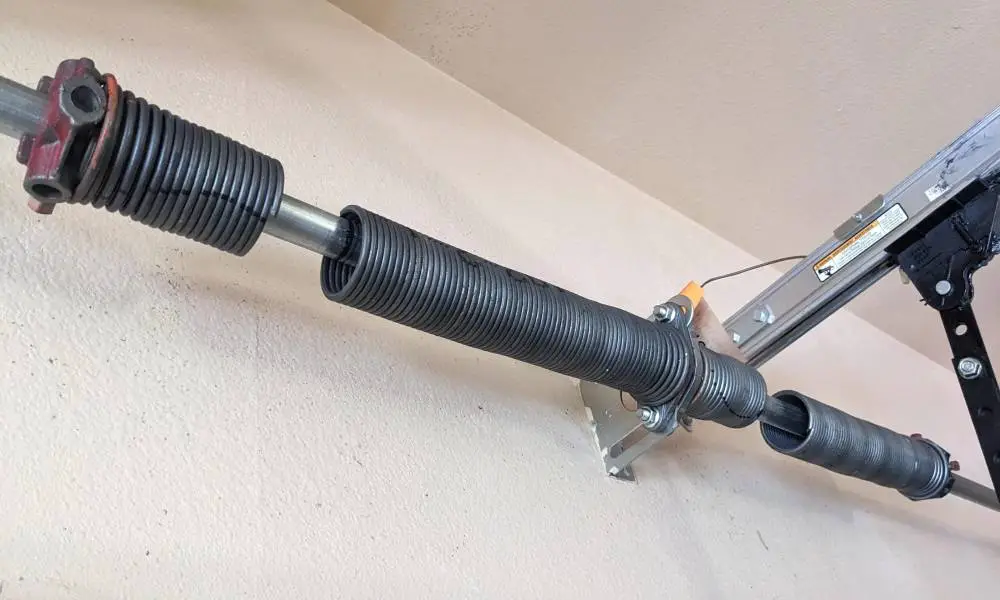
Disconnection and Inspection
Understanding the procedure of separating the springs from each other and the center wall bracket is crucial. This step is accompanied by a visual inspection guide to identify any potential issues or additional components that may need attention. Follow these steps for a systematic approach:
- Use two 9/16-inch wrenches to disconnect the springs from the center wall bracket.
- Pay attention to any resistance or jamming caused by the broken spring.
- Visual inspection of the springs and the center wall bracket for wear, damage, or misalignment.
- Ensure a thorough examination of the components before proceeding to the next step.
This step ensures that the springs are ready for replacement and that any underlying issues are identified and addressed.
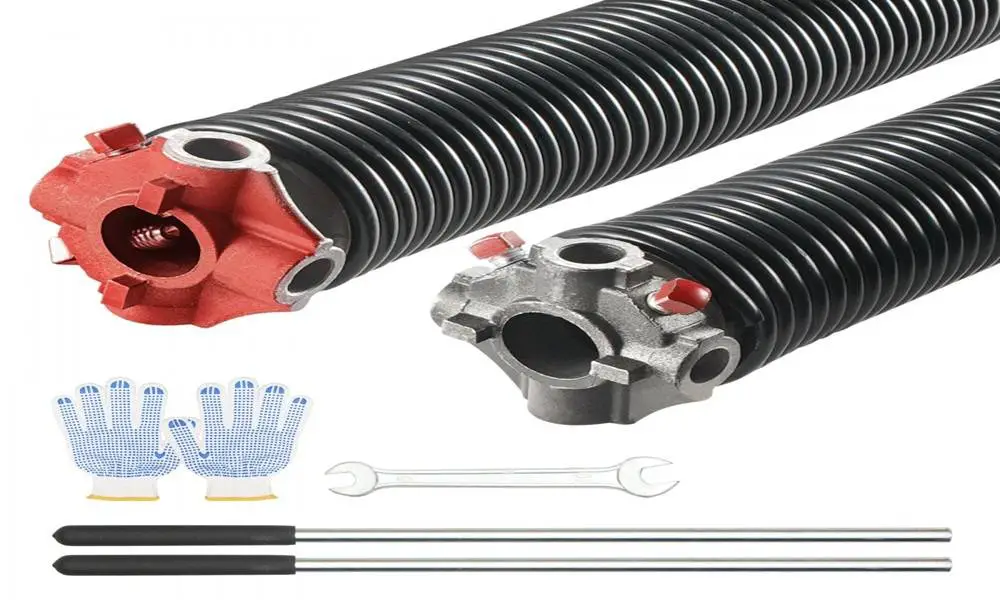
Replacing Broken Springs
Now that the springs are disconnected and inspected, it’s time to proceed with the actual replacement of the broken springs. This step-by-step guidance highlights the significance of attention to detail and the use of proper tools. Follow these instructions for a smooth replacement process:
- Loosen the set bolts on the broken springs to free them from the torsion bar.
- Slide the broken springs off the torsion bar and remove them from the assembly.
- Ensure the replacement springs are identical in specifications to the ones being removed.
- Secure the new springs in place on the torsion bar, tightening the set bolts to ensure a firm grip.
This meticulous process guarantees a seamless replacement, ensuring the proper functioning of the garage door.
Technical Details: Tools and Measurements
Necessary Tools
An overview of the tools required for the job is crucial for a successful garage door spring replacement. Understanding the specifications and purposes of each tool ensures a smooth execution. Here’s a detailed look at the necessary tools:
- Turning Bars: Essential for winding and unwinding the springs safely.
- Wrenches: Specifically, 3/8-inch and 9/16-inch wrenches for various bolts and set screws.
- Pliers: Useful for tasks such as disconnecting the garage door opener arm.
- Vises: To securely hold components in place during certain stages of the replacement.
- Safety Gear: Including gloves and protective eyewear to ensure personal safety during the process.
Having these tools on hand ensures that each step is executed efficiently and safely.
Winding the Springs
In-depth guidance on the winding process is essential for understanding the number of turns required based on the door’s dimensions. This step ensures that the springs are correctly wound to match the specifications of the garage door. Follow these instructions for a precise winding process:
- For an eight-foot door, each rotation of the spring requires four turns.
- The total number of turns depends on the door’s height, with 32 turns typically needed for an eight-foot door.
- Ensure the turning bars are securely seated in the cone during the winding process to prevent slippage.
This technical detail ensures that the springs are correctly wound, contributing to the overall functionality of the garage door.
Ensuring Safety: Cable and Drum Considerations

Cable Inspection and Replacement
A detailed examination of the cables is crucial for ensuring the safety and longevity of the garage door system. Understanding their role and identifying the opportune moment for cable replacement is essential. Follow these steps for a comprehensive cable inspection:
- Inspect each cable for signs of fraying, wear, or damage.
- If any cables show signs of wear, it’s advisable to replace them at this stage.
- Ensure that the cables are securely attached to the drums and are free from any obstructions.
This step contributes to the overall safety and efficiency of the garage door system.
Drum Loosening and Cable Connection
The drums play a crucial role in the garage door’s operation, and their proper functioning is essential for a smooth replacement process. Follow this step-by-step approach to loosening the drums, disconnecting the cables, and ensuring a seamless reattachment:
- Turn the set bolts on the drums counterclockwise to loosen them from the torsion bar.
- Once loosened, slide the drums back and disconnect the cables.
- Inspect the cables for any issues and replace them if necessary.
- Reconnect the cables to the drums, ensuring a secure.
Finalizing the Installation: Putting It All Together
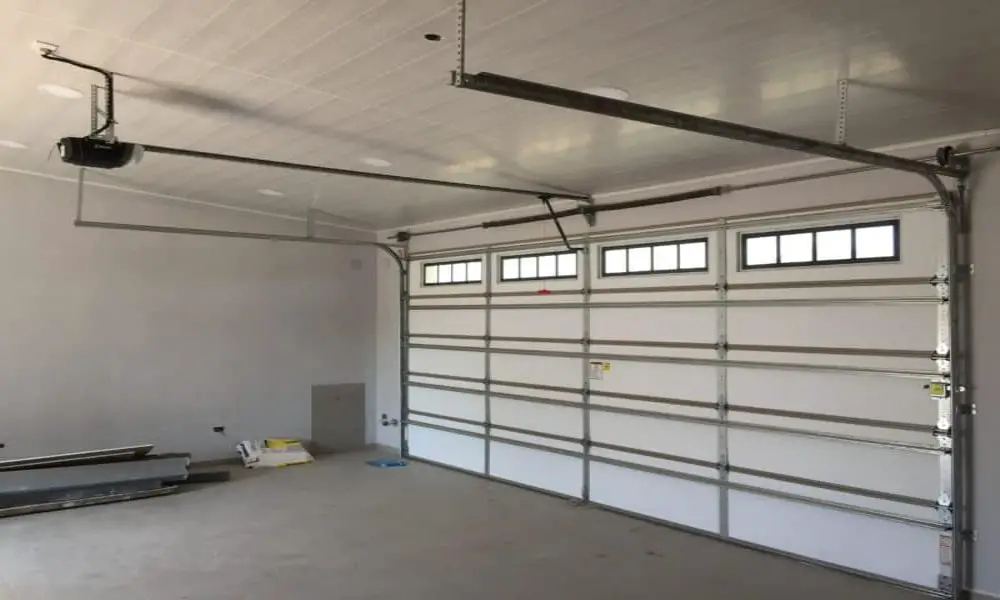
Resetting Springs and Final Checks
The culmination of the garage door spring replacement involves resetting the springs, mounting them to the center wall bracket, and conducting thorough final checks. This stage is crucial for ensuring the seamless functionality and safety of the entire garage door system. Follow these comprehensive steps:
- Resetting the Springs:
- Begin by positioning the replacement springs onto the torsion bar. Ensure they are evenly distributed and securely seated.
- Slide the springs into place, aligning them with the center wall bracket.
- Tighten the set bolts to secure the springs onto the center wall bracket. Use the appropriate wrenches to ensure a snug fit.
- Verify that the springs are evenly spaced and parallel, minimizing any potential misalignment issues.
- Mounting to the Center Wall Bracket:
- Align the center wall bracket with the springs and secure it in place using the provided bolts and nuts.
- Ensure that the bracket is tightly fastened to the wall, providing a stable foundation for the springs.
- Confirm that the springs are securely attached to the bracket, double-checking for any signs of movement or instability.
- Performing Final Checks:
- Inspect the entire assembly for any loose bolts, nuts, or components. Tighten any fasteners that may have loosened during the installation process.
- Verify that the turning bars are removed from the cone and that all tools have been safely cleared from the workspace.
- Check the cables to ensure they are properly threaded through the drums and securely connected.
- Examine the garage door for smooth movement by manually lifting and lowering it. Ensure there are no unusual sounds or resistance.
By meticulously following these steps, you guarantee that the springs are correctly reset, securely mounted, and all components are in optimal working condition. This comprehensive approach minimizes the risk of future issues and enhances the overall longevity of the garage door system.
Conclusion
The installation of garage door springs is a task that demands precision, attention to detail, and a deep commitment to safety. This guide has walked you through each step of the process, from disconnecting the garage door opener to the final resetting of the springs. Emphasizing the importance of meticulous execution and safety precautions, this undertaking is not only about replacing components but also ensuring the reliable and secure operation of your garage door.
By following the advice of experts like Victor from garagesideas.com and understanding the risks associated with DIY attempts, you’ve taken a significant step toward maintaining a safe and functional garage door. Remember that the intricate system of springs, cables, and drums requires careful handling and professional expertise.
Always prioritize safety, and if you find yourself unsure or uncomfortable with any step of the process, it’s highly recommended to seek the services of a professional garage door company. Your safety and the longevity of your garage door system are paramount.
Now that you’ve successfully replaced your garage door springs, take a moment to appreciate the accomplishment. Your efforts contribute not only to the functionality of your garage door but also to the overall safety and security of your home.


