Broken Garage Door Spring
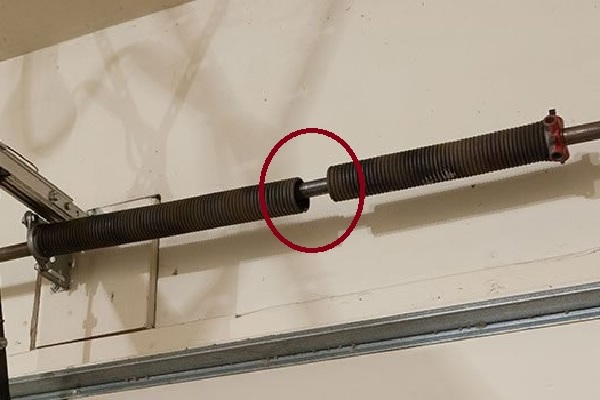
Hey everyone, Today, we’ll be diving deeper into a common issue that many homeowners encounter – a broken garage door spring. Your garage door’s smooth operation depends on the functionality of its springs, which act as counterweights to help the door open and close efficiently.
Unfortunately, these springs can break over time due to wear and tear, causing inconvenience and potential safety risks. In this comprehensive guide, we’ll walk you through the process of replacing a broken garage door spring safely and effectively.
Types of Garage Door Springs
Garage doors typically utilize two main types of springs: extension springs and torsion springs. Each type has its unique characteristics and functions.
Extension Springs
Extension springs are usually found positioned just above the door tracks, running parallel to the ceiling. They play a vital role in counterbalancing the weight of the garage door and assisting in its opening and closing mechanism.
These springs are connected to the rear track hanger at one end and to one or two pulleys at the other end. Safety cables are installed through the center of the springs to prevent injury or property damage in case of breakage.
Extension springs function by stretching to maintain tension on the pulleys and cables, supporting the weight of the garage door. Their pulling weight can range from 50 to 440 pounds, depending on the size and type of door.
Typically, extension springs have an expected lifespan of around 10,000 cycles, equivalent to one opening and closing of the door. However, extended-life springs are available, offering durability for up to 20,000 cycles.
Torsion Springs
Torsion springs are mounted above the garage door, parallel to the doors themselves. They are installed in pairs onto a horizontal shaft connected to cable drums at either end. Brackets support the shaft, with a center bracket separating the pair of springs. Unlike extension springs, torsion springs work on tension, wound tightly on the shaft.
When the garage door opens, tension is gradually released, causing the spring to unwind. Conversely, when the door closes, the springs are put back into tension. Torsion springs typically have a longer service life compared to extension springs, averaging between 15,000 to 20,000 cycles.
Identifying the Right Replacement Spring
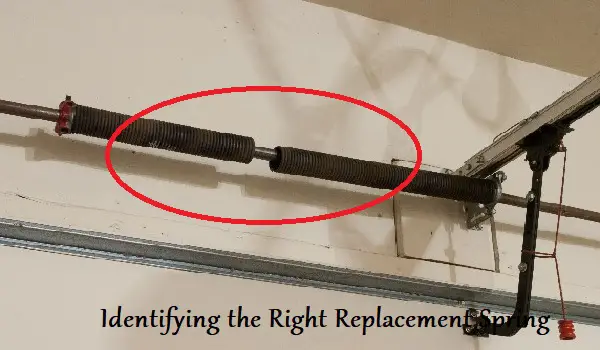
The key to a successful garage door spring replacement lies in selecting the right replacement. When purchasing a new spring, consider the following factors:
- Rod Thickness: Measure the thickness of the rod on your existing spring. Ensure that the replacement spring matches this measurement for a proper fit.
- Spiral Size: Pay attention to the size of the spiral or the space between the coils. This dimension directly affects the spring’s strength and its ability to lift the garage door.
- Total Length: Measure the overall length of the spring to ensure that the replacement matches the existing one.
If you can’t find an exact match for your broken spring, it’s recommended to opt for a slightly stronger version with a thicker spring, ensuring adequate power and support.
Replacement Procedure for Extension Springs
When it comes to replacing extension springs, it’s essential to follow a systematic approach to ensure safety and proper functionality of the garage door.
- Measure the old spring: Begin by measuring the length, inside diameter, and wire size of the old spring.
- Order the appropriate replacement: Based on the measurements, order the correct replacement springs suitable for your garage door.
- Prepare for replacement: Unplug the garage door opener and securely clamp the door to the track to prevent any movement.
- Remove existing springs: Carefully remove the existing extension springs, ensuring to release all tension from the system.
- Install new springs: Install the new extension springs, making sure they match the weight and height specifications of your garage door.
- Test the door: After installation, check the balance and function of the garage door to ensure smooth operation.
Replacement Procedure for Torsion Springs
Replacing torsion springs requires precision and caution to avoid accidents or damage to property. Follow these steps carefully:
- Measure and find the correct size: Measure the length, inside diameter, and wire size of the existing torsion springs to determine the appropriate replacements.
- Prepare for replacement: Close the garage door completely and disconnect the opener to prevent any unintended movement.
- Secure the door: Affix a C-clamp to the track to secure the garage door in place during the replacement process.
- Remove existing springs: Carefully remove the existing torsion springs from the shaft, taking note of the winding direction.
- Install new springs: Install the new torsion springs, winding them tightly onto the shaft in the correct direction.
- Test the door: Once the installation is complete, check the balance of the garage door by manually lifting it to ensure proper functioning.
Assessing the Type and Size of the Broken Spring
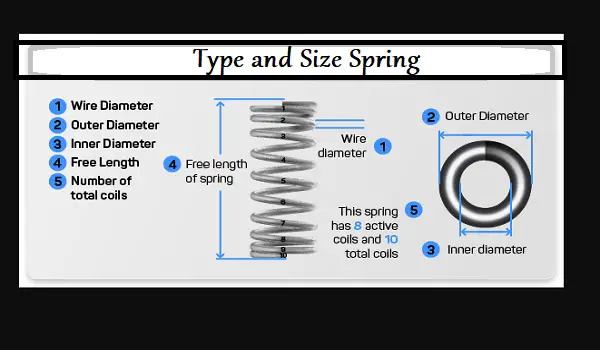
Here are the steps on how to assess the type and size of a broken spring:
- Identify the location of the broken spring. This may be difficult if the spring is hidden inside a component. In this case, you may need to disassemble the component to access the spring.
- Once you have located the broken spring, inspect it carefully. Look for any identifying markings, such as the spring’s type, size, and material. If the spring is unmarked, you may need to measure it to determine its type and size.
- If the spring is unmarked and you cannot measure it, you may need to contact the manufacturer of the component to obtain the spring’s specifications.
Here are some additional tips for assessing the type and size of a broken spring:
- If the spring is a compression spring, it will have coils that are wound in a tight spiral. If the spring is an extension spring, it will have coils that are wound in a loose spiral.
- The type of spring can also be determined by its material. Compression springs are typically made of steel, while extension springs are typically made of stainless steel or phosphor bronze.
- The size of the spring can be determined by measuring its diameter and length. The diameter is the width of the spring, and the length is the distance between the ends of the spring.
Once you have determined the type and size of the broken spring, you can order a replacement spring from a reputable supplier.
Read Also: How to Tell What Garage Door Spring i Need
Gathering the Necessary Tools
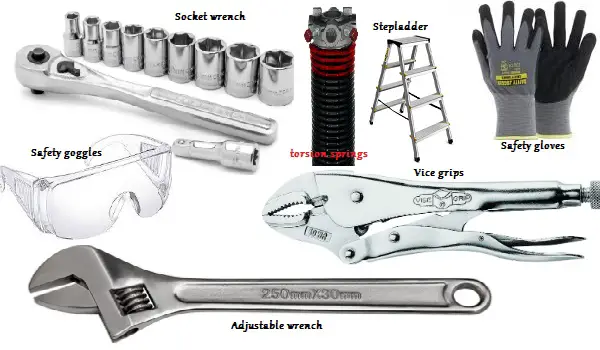
To replace the broken garage door spring, gather the following tools:
- Adjustable wrench
- Socket wrench
- Vice grips
- Safety gloves
- Safety goggles
- Stepladder
- Replacement spring
Having these tools ready will ensure a smooth and efficient replacement process.
How to replace garage door spring
Now, let’s get to the heart of the matter the step-by-step DIY replacement process. Follow these instructions meticulously for a successful and safe replacement:
Step 1: Disengage the Garage Door Opener
To begin, disconnect the garage door opener to prevent any unintended movement of the door during the repair process.
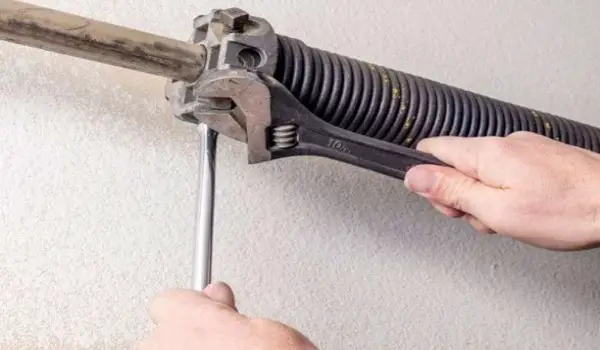
Step 2: Unwind and Remove the Broken Spring
Using the appropriate tools, carefully loosen the set screws on the spring’s stationary cone and slide it off the rod.
Next, release the tension on the spring gradually, adhering to the manufacturer’s guidelines. Once the spring is fully unwound, safely remove it from the garage door assembly.
Step 3: Install the New Spring
Position the new spring on the garage door rod, ensuring that it aligns correctly. Secure the spring in place using the set screws, but be careful not to overtighten them at this stage.
Step 4: Wind the New Spring
With caution, wind the new spring in 45-degree increments, following the manufacturer’s specific instructions. It is vital to maintain consistent tension on both sides to achieve a balanced and smooth operation.
Step 5: Check Tension and Balance
After winding the spring, check the tension and balance of the garage door. The door should open and close smoothly with minimal effort. If necessary, adjust the tension to attain the desired balance.
Step 6: Reconnect the Garage Door Opener
With the garage door operating smoothly, re-engage the garage door opener.
Read Also: Resetting Garage Door Opener
Conclusion
Addressing garage door spring issues promptly is crucial for maintaining the functionality and safety of your garage door. Whether it’s extension springs or torsion springs, understanding their functions and following proper replacement procedures is essential. Prioritize safety at all times, and if in doubt, seek professional help to ensure a successful repair.
FAQs
Can I replace just one spring if the other is still working?
While it is technically possible to replace just one spring, it is recommended to replace both springs simultaneously. Replacing both springs ensures even tension and prevents one spring from wearing out faster than the other.
How often should garage door springs be replaced?
Garage door springs have a limited lifespan and may need replacement every 7-9 years, depending on their usage and the climate. Regular maintenance can extend their life.
Can I use a stronger spring for better performance?
Using a slightly stronger spring than the original can be beneficial for improved lifting capacity and longevity. avoid using significantly stronger springs, as they may put excessive strain on other parts of the garage door system.
Can I replace a broken spring myself?
If you have the necessary tools, experience, and confidence in handling garage door springs, you can attempt the replacement. Otherwise, it’s safer to hire a professional to do the job.
What are the signs of a failing garage door spring?
Some common signs of a failing garage door spring include visible wear and tear, difficulty in opening or closing the garage door, and a loud snapping sound when the spring breaks.


