As a DIYer, I’ve seen my fair share of cluttered and disorganized garages. It’s not only frustrating, but it can also be dangerous.
That’s why I’m always on the lookout for inexpensive garage wall ideas that can help me maximize my space and keep my tools and equipment organized.
Why You Need Inexpensive Garage Wall Ideas
As I mentioned earlier, a cluttered and disorganized garage can be a safety hazard. But it’s not just that. An unorganized garage can also be a major productivity killer. When you have to spend time searching for tools and equipment, it can be hard to get anything done.
That’s why I’m such a big fan of inexpensive garage wall ideas. These ideas can help you maximize your space and keep your tools and equipment organized. This will make your garage safer, more productive, and more enjoyable to use.
The Benefits of Inexpensive Garage Wall Ideas
In addition to the safety and productivity benefits, there are a few other reasons why you should consider inexpensive garage wall ideas. For one, these ideas are often very easy to implement. You don’t need to be a DIY expert to get started.
Another benefit of inexpensive garage wall ideas is that they’re very affordable. You can often find the materials you need at your local hardware store. And even if you do have to buy some special tools, the cost will be minimal.
So if you’re looking for a way to improve your garage, I encourage you to consider inexpensive garage wall ideas. These ideas can make a big difference in the functionality and aesthetics of your space.
Here are 10 inexpensive garage wall ideas
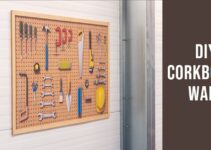
1. Painted Pegboard Wall
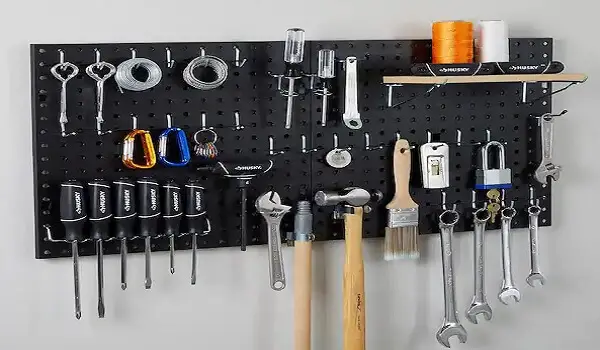
One of the easiest and most versatile garage wall ideas is a painted pegboard wall.
A pegboard wall offers a customizable and organized storage solution while adding a pop of color to your garage.
Pros:
- Affordable and readily available.
- Versatile storage solution for tools and accessories.
- Easy to customize and reconfigure.
- Provides a neat and organized appearance.
Cons:
- Limited aesthetic appeal compared to other options.
- Requires proper installation to ensure stability.
How to Create a Painted Pegboard Wall
- Measure and cut the pegboard to fit your desired wall space.
- Sand the surface to ensure proper adhesion of paint.
- Apply a primer coat to the pegboard for better paint adhesion.
- Choose a color that complements your garage’s overall theme and apply a coat of paint.
- Once the paint is dry, mount the pegboard on the wall using screws or anchors.
- Hang hooks, shelves, and other accessories on the pegboard to organize your tools and equipment.
2. Magnetic Wall Panels

Another affordable and convenient option for garage wall decor is magnetic wall panels. Magnetic panels offer a practical way to store and display metal tools and objects, keeping your garage neat and tidy. Let’s explore the advantages of magnetic wall panels:
Pros:
- Convenient storage for metal tools and small items.
- Easy access and visibility of stored items.
- Can be combined with other storage systems.
- Simple installation process.
Cons:
- Limited to metal items only.
- Not suitable for large or heavy tools.
Installing Magnetic Wall Panels
- Measure the wall space where you want to install the magnetic panels.
- Purchase magnetic panels suitable for your desired dimensions.
- Clean the wall surface to ensure proper adhesion.
- Apply adhesive to the back of the magnetic panels.
- Press the panels firmly onto the wall and hold them in place until the adhesive sets.
- Once the panels are securely attached, you can start arranging and organizing your metal tools.
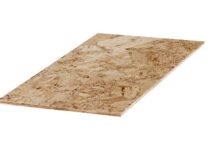
3. DIY Corkboard Wall
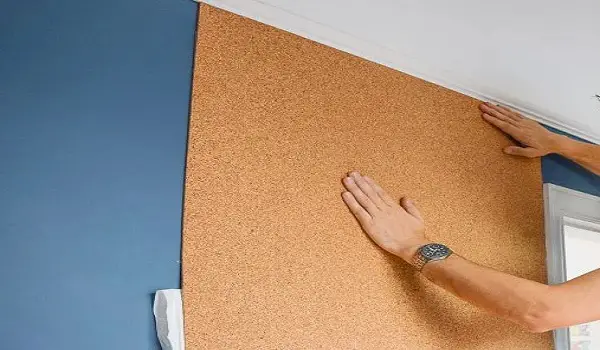
A DIY corkboard wall is an affordable and functional solution that allows you to pin important notes, reminders, and documents. Let’s explore the reasons why a DIY corkboard wall can be a great addition to your garage:
Pros:
- Practical for pinning notes, reminders, and project plans.
- Acts as a sound absorber, reducing echo.
- Easy to install and customize.
- Adds a unique texture and visual interest.
Cons:
- Limited storage options compared to other alternatives.
- Requires regular maintenance to keep the cork in good condition.
Steps to Create a DIY Corkboard Wall
- Measure the wall space where you want to install the corkboard.
- Purchase corkboard sheets in the desired dimensions.
- Clean the wall surface and ensure it is smooth.
- Apply adhesive to the back of the corkboard sheets.
- Press the sheets firmly onto the wall, ensuring they are aligned.
- Trim any excess corkboard and add a frame if desired.
4. Pallet Board Accent Wall
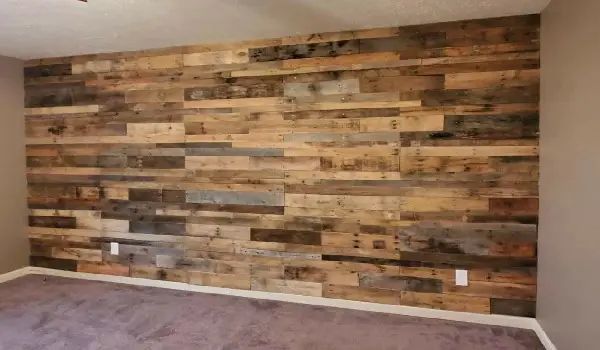
For a rustic and eco-friendly garage wall idea, consider a pallet board accent wall. Pallet boards are often discarded and can be obtained for little to no cost. Gather pallet boards of similar sizes and sand them down to remove any rough edges.
Then, attach them to the wall using nails or screws. The natural texture and warm tones of the pallet boards will add character and charm to your garage.
This wall can serve as a focal point or backdrop for your workbench, tool storage area, or even a seating nook.
Pros:
- Offers a rustic and visually appealing look.
- Inexpensive or even free if using reclaimed pallet boards.
- Adds warmth and character to the garage space.
- Can be a DIY project.
Cons:
- Requires time and effort for proper preparation and installation.
- Limited storage functionality.
How to Make a Pallet Board Accent Wall
To create a pallet board accent wall, follow these steps:
- Source Pallets: Find reclaimed pallets from local suppliers or online platforms. Make sure they are clean, free from damage, and safe to use.
- Prepare the Wall: Clean the wall surface and remove any existing paint or wallpaper. Sand it lightly to create a smooth base.
- Cut and Install Pallet Boards: Measure the height and width of the wall and cut the pallet boards accordingly. Start at the bottom and use a nail gun or screws to attach the boards to the wall, layering them horizontally.
- Secure and Finish: Ensure the boards are securely fastened to the wall. Optionally, apply a clear sealant or stain to enhance the wood’s natural beauty and protect it from moisture.
5. Chalkboard Wall
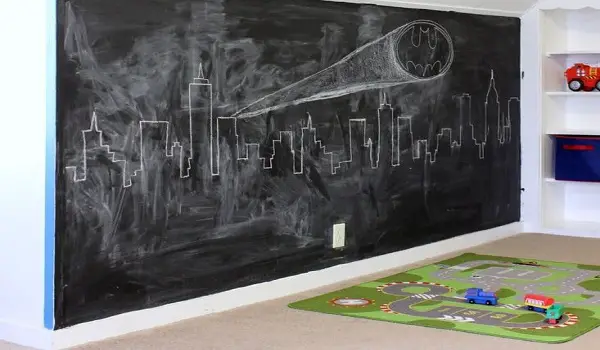
Unleash your creativity with a chalkboard wall in your garage. Chalkboard paint is affordable and can transform any ordinary wall into a canvas for your ideas and doodles.
Apply several coats of chalkboard paint to the designated area and allow it to cure. Once dry, you can use regular chalk or chalk markers to write messages, make to-do lists, or even create art.
A chalkboard wall is not only functional but also adds a playful and interactive element to your garage.
Pros:
- Provides a versatile surface for writing notes and reminders.
- Adds an element of creativity and personalization.
- Easy to clean and maintain.
- Can be used for temporary drawings or designs.
Cons:
- Dust from chalk may require regular cleaning.
- May not suit all garage styles or themes.
Creating Your Own Chalkboard Wall
To create a chalkboard wall in your garage, follow these steps:
- Choose the Wall: Select a suitable wall in your garage. Make sure it’s smooth and clean.
- Prep the Surface: Apply a primer or chalkboard paint primer to the wall. Let it dry according to the manufacturer’s instructions.
- Apply Chalkboard Paint: Use a roller or brush to apply several coats of chalkboard paint, allowing each coat to dry before applying the next.
- Condition the Surface: Once the paint is completely dry, condition the chalkboard surface by rubbing the entire wall with the side of a chalk stick. Wipe off the chalk dust with a soft cloth.
6. Reclaimed Wood Wall
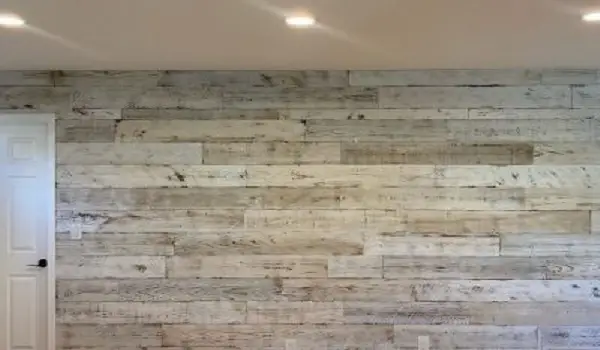
If you’re a fan of rustic aesthetics, a reclaimed wood wall is an excellent choice to add warmth and texture to your garage.
Seek out discarded wood pallets, old barn boards, or even salvage yards for reclaimed wood. Prepare the wood by cleaning and sanding it to create a smooth surface.
Then, attach the wood pieces to the wall using screws or adhesive. The natural variations in color and grain of reclaimed wood will give your garage a unique and inviting atmosphere.
Pros:
- Offers a rustic and natural aesthetic.
- Can be an environmentally friendly option.
- Adds texture and warmth to the garage.
- Can be sourced at a low cost or even for free.
Cons:
- Requires careful selection and preparation of reclaimed wood.
- Time-consuming installation process.
Installing a Reclaimed WoodWall
To install a reclaimed wood wall in your garage, follow these steps:
- Source Reclaimed Wood: Find reclaimed wood from salvage yards, architectural salvage stores, or online suppliers. Make sure the wood is clean, treated if necessary, and free from pests.
- Prepare the Wall: Clean the wall surface and remove any existing paint or wallpaper. Ensure the wall is dry and smooth.
- Measure and Cut: Measure the dimensions of the wall and cut the reclaimed wood planks to fit. Sand the edges if needed.
- Attach the Wood: Use construction adhesive or screws to attach the wood planks to the wall. Start at the bottom and work your way up, ensuring the planks are level and properly aligned.
- Finish and Seal: Optionally, apply a clear sealant or wood finish to protect the reclaimed wood and enhance its natural beauty.
7. Vinyl Wall Decals
For a quick and affordable garage wall makeover, vinyl wall decals are a fantastic option. These adhesive stickers come in various designs, patterns, and sizes, allowing you to personalize your space effortlessly.
Vinyl decals are easy to apply and remove, making them ideal for renters or those who frequently change their décor.
Whether you prefer motivational quotes, nature-inspired themes, or sports-related graphics, vinyl wall decals offer a simple and budget-friendly way to add personality to your garage walls.
Pros:
- Affordable and easy to apply.
- Wide range of designs and styles available.
- Can be removed or changed without damaging the wall.
- Allows for personalization and customization.
Cons:
- Limited to the design and size of available decals.
- May not provide extensive storage or organizational benefits.
Applying Vinyl Wall Decals
To apply vinyl wall decals to your garage walls, follow these steps:
- Clean the Surface: Ensure the wall is clean and free from dust or grease. Use a mild detergent and water to remove any dirt or residue. Let the wall dry completely.
- Plan and Position: Determine the desired placement of the decals. Use a pencil or painter’s tape to mark the positions on the wall, ensuring proper alignment and spacing.
- Peel and Stick: Carefully peel off the backing of the vinyl decal, starting from one corner. Align the decal with the marked position on the wall and slowly press it onto the surface, smoothing out any bubbles or wrinkles.
- Smooth and Secure: Use a credit card or a squeegee to firmly press the decal onto the wall, starting from the center and working your way outwards. Make sure the edges are securely adhered.
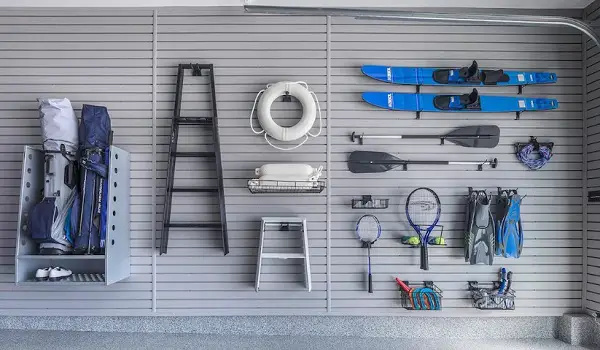
8. Metal Grid Wall
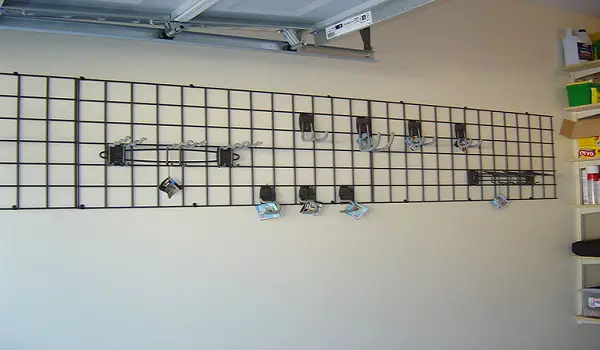
A metal grid wall provides a modern and industrial look while maximizing storage potential. You can find metal grid panels at hardware stores or online retailers.
These panels are typically made of durable metal, such as steel or wire mesh, and can be easily mounted on the wall using screws or hooks.
The grid pattern allows you to attach hooks, baskets, and shelves to store various items, including tools, gardening supplies, and sports equipment. Embrace the sleekness of a metal grid wall and transform your garage into an organized haven.
Pros:
- Versatile storage system for tools and equipment.
- Easy to adjust and reconfigure as needed.
- Allows for visibility and accessibility of stored items.
- Offers a modern and industrial aesthetic.
Cons:
- May require additional hooks or accessories for proper storage.
- Can be more expensive compared to other options.
Setting up a Metal Grid Wall
To set up a metal grid wall in your garage, follow these steps:
- Measure and Mark: Measure the dimensions of the wall where you want to install the metal grid. Mark the positions of the grid panels, ensuring they are level and evenly spaced.
- Mounting Options: Determine the mounting method based on the type of metal grid you have. It can be attached directly to the wall using screws or suspended from the ceiling using hooks and chains.
- Secure the Grid: Use appropriate hardware, such as screws or hooks, to securely fasten the metal grid panels to the wall or ceiling. Make sure they are level and stable.
- Accessorize: Attach hooks, shelves, and other accessories to the metal grid, customizing it to suit your storage and organization needs.
9. Fabric Wall Coverings
For a softer and more textured approach, consider fabric wall coverings for your garage. Fabrics offer endless possibilities in terms of colors, patterns, and textures. Choose a fabric that suits your garage’s style and durability requirements.
Install fabric wall coverings by using adhesive or staples to secure them to the wall. Fabrics can add warmth, sound absorption, and a cozy atmosphere to your garage.
Fabric wall coverings are an excellent solution for those looking to cover up imperfections or blemishes on the existing walls.
Pros:
- Softens the garage space and reduces echo.
- Provides insulation and temperature control.
- Offers a wide variety of colors and patterns.
- Can be easily installed and removed.
Cons:
- Requires regular cleaning and maintenance.
- May not provide extensive storage functionality.
Installing Fabric Wall Coverings
To install fabric wall coverings in your garage, follow these steps:
- Select Fabric: Choose a fabric that is suitable for wall applications. Consider durability, colorfastness, and the desired aesthetic.
- Prepare the Wall: Ensure the wall surface is clean and free from imperfections. Repair any cracks or holes and sand the surface lightly if needed.
- Apply Adhesive: Apply a fabric adhesive or wallpaper paste to the back of the fabric, following the manufacturer’s instructions.
- Hang the Fabric: Starting from one corner of the wall, carefully position the fabric and press it onto the wall, smoothing out any wrinkles or bubbles.
- Trim and Finish: Trim any excess fabric using a sharp utility knife. Use a wallpaper smoothing tool to ensure the fabric is securely adhered to and smooth.
10. Bike Storage Wall Mount
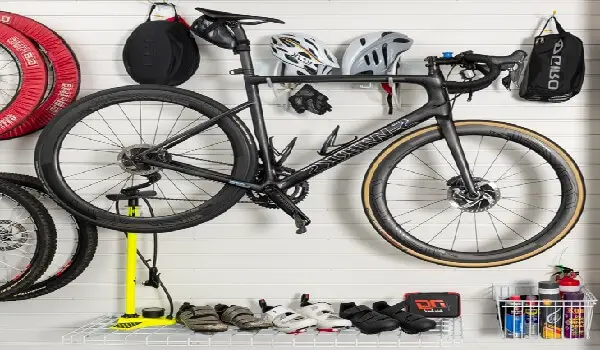
If you’re an avid cyclist and want to maximize your garage space, a bike storage wall mount is a game-changer.
These mounts allow you to hang your bicycles vertically, freeing up valuable floor space. Bike storage wall mounts come in various designs, such as hooks, brackets, or specialized hangers.
Choose a mount that securely holds your bikes and install it on the wall at a suitable height. This solution not only keeps your bikes organized and easily accessible but also adds a sporty and dynamic element to your garage walls.
Pros:
- Saves floor space and keeps bikes organized.
- Allows for easy access and visibility of bikes.
- Can be adjusted to accommodate different bike sizes.
- Adds a unique and stylish display element.
Cons:
- Limited to bike storage only.
- Requires proper installation to ensure stability.
Installing a Bike Storage Wall Mount
To install a bike storage wall mount in your garage, follow these steps:
- Choose the Location: Select a suitable area on the wall where you want to install the bike storage mount. Ensure it is at a convenient height and provides enough clearance for the bikes.
- Mark the Positions: Use a level and a pencil to mark the positions where the bike hooks or brackets will be installed. Ensure they are evenly spaced and aligned.
- Install the Mounting Hardware: Depending on the type of bike storage wall mount, use appropriate screws, bolts, or anchors to securely attach the mounting brackets or hooks to the wall. Make sure they are level and properly fastened.
- Hang the Bikes: Hang each bike on the designated hooks or brackets, ensuring they are stable and securely supported. Adjust the hooks if needed to accommodate different bike sizes or handlebar widths.
Read Also:
Inexpensive Garage Organization Ideas
Conclusion
As a DIYer who has transformed my own garage into a well-organized and visually appealing space, I can attest to the benefits of inexpensive garage wall ideas. These ideas can help you maximize your space, enhance functionality, and create a workspace that inspires productivity.
Here are a few of my favorite inexpensive garage wall ideas:
- Use pegboard to create a custom storage system. Pegboard is a versatile and affordable material that can be used to create a variety of storage solutions. I used pegboard to hang my tools, equipment, and even small appliances.
- Install wall-mounted shelves. Wall-mounted shelves are a great way to store bulky items that you don’t use on a regular basis. I installed shelves to store my seasonal decorations and sporting equipment.
- Paint your walls a bright color. A fresh coat of paint can do wonders for the look and feel of your garage. I painted my walls a bright blue color to brighten up the space and make it feel more inviting.
- Add some personal touches. If you want your garage to feel more like a home, add some personal touches. I hung photos of my family and friends on the walls, and I also displayed some of my favorite artwork.
These are just a few of the many inexpensive garage wall ideas that you can use to transform your space. With a little creativity, you can create a garage that’s both functional and stylish.
I hope this article has inspired you to get started on your own garage wall makeover. With a little effort, you can create a space that you’ll be proud of and that will make your life easier.
Remember, a well-organized garage not only makes your life easier but also adds value to your home. Start implementing these inexpensive garage wall ideas today and enjoy the benefits of a more functional and visually appealing space.