Are you tired of bikes cluttering up your garage space? Do you want a cost-effective and straightforward solution to store your bikes?
Look no further! In this article, I will share with you an under $20 bike storage solution that is super simple to implement, requiring only basic tools and materials.
Let’s take a look and make your garage organized and bike-friendly
Store Bikes in the Garage
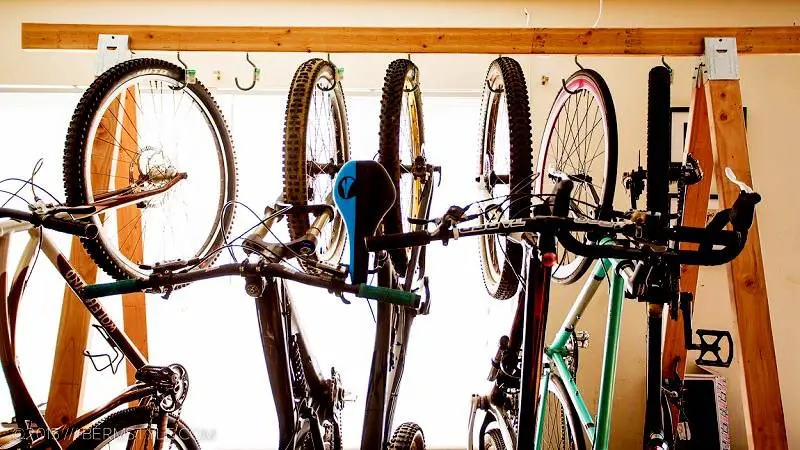
Keeping bikes in the garage can save space and protect them from the elements. Without a proper storage solution, it can quickly become a cluttered mess.
The method I will explain here is budget-friendly and easy to set up. You’ll only need a few basic materials and tools to get started.
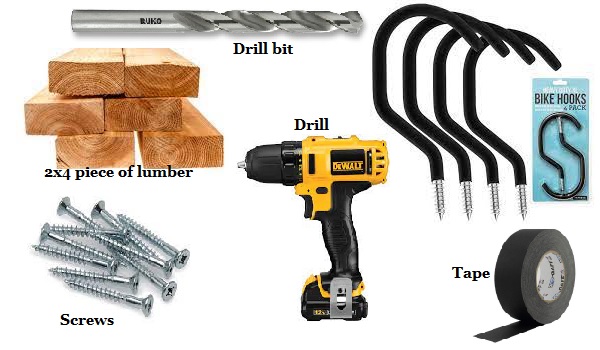
Required Materials
Before we begin, let’s gather the materials required for this project. Here’s what you’ll need:
- 2×4 piece of lumber (approximately 6-7 feet long)
- Bicycle hooks (large enough to fit a 2.8 tire)
- Screws
- Drill
- Drill bit (appropriate for pre-drilling holes)
- Tape (electrical or gaff tape)
How to install bike hooks on a wall
Step 1: Gathering the Materials
To start, ensure you have all the materials listed above. Having everything ready beforehand will make the process smoother.
Step 2: Cutting the 2×4
If necessary, cut the 8-foot 2×4 piece down to a length that suits your available space. A length of 6-7 feet is generally sufficient.
Consider the number of bikes you plan to store and the available room. Remember, the more bikes you have, the more space you’ll need.
Step 3: Locating the Studs
To securely hang the 2×4 on the wall, you need to locate the wall studs. Using a stud finder or other suitable methods, mark the positions of the studs.
Step 4: Mounting the 2×4
Using screws, attach the 2×4 to the wall studs. It’s recommended to use two screws for each stud to ensure stability and prevent the 2×4 from falling down.
Step 5: Determining Bike Placement
Decide how you want to position your bikes on the 2×4. Vertical storage works well, and you can also hang some of the bikes upside down to optimize space.
Make sure to leave enough room between the bikes for easy access and to prevent handlebars from colliding.
Step 6: Preparing the Hooks
Before attaching the hooks to the 2×4, pre-drill holes using an appropriate drill bit. This step will make it easier to install the hooks securely.
Step 7: Installing the Hooks
Insert the hooks into the pre-drilled holes. Ensure they are firmly in place. The hooks should be large enough to accommodate a 2.8 tire and preferably have a rubber coating to protect the rim.
If the rubber coating is damaged, you can wrap electrical or gaff tape around it to provide cushioning.
Read Also: Garage Interior Storage: Organizing Tips and Ideas

Conclusion
Congratulations! You have successfully created an affordable and practical bike storage solution for your garage.
By following the steps outlined in this article, you can now enjoy a clutter-free space while keeping your bikes easily accessible.
Remember, this method can be customized based on the number of bikes and available space in your garage.