Plastering garage walls is a rewarding DIY project that can transform your garage into a clean and aesthetically pleasing space.
Whether you plan to use your garage as a workshop, storage area, or even extra living space, plastering the walls can significantly enhance its appearance and functionality.
In this step-by-step guide, we will walk you through the process of plastering your garage walls, providing valuable tips and techniques to achieve professional-looking results.
Why Plaster Your Garage Walls?
Plastering garage walls offers several advantages that make it a worthwhile endeavor. First and foremost, plastered walls provide a smooth and clean surface, hiding imperfections and creating a polished finish.
This not only improves the overall appearance of your garage but also makes it easier to maintain and keep clean. Plastering helps to strengthen the walls, increasing their durability and longevity.
The Plastering Process
Before diving into the plastering process, it’s essential to gather the necessary materials and tools. You will need:
- Plaster mix (base coat and skim coat)
- Water
- Large bucket
- Trowel
- Sandpaper (medium and fine grit)
- Putty knife
- Sponges
- Dust mask
- Safety goggles
- Drop cloths or plastic sheets
With all the materials and tools at the ready, let’s proceed with the step-by-step guide to plastering your garage walls.
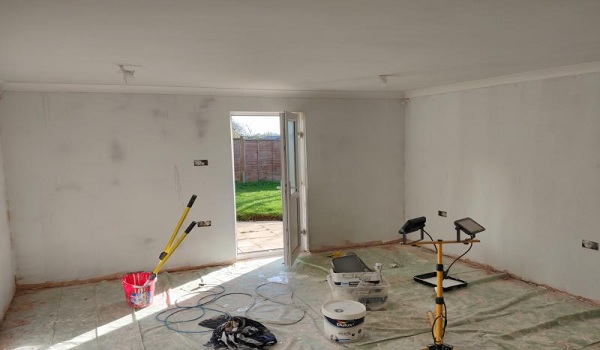
Step 1: Prepare the Walls
The key to a successful plastering project is proper wall preparation. Follow these steps to ensure a solid foundation for your plaster:
Removing Loose or Damaged Material: Start by inspecting the walls for any loose paint, plaster, or other debris. Use a putty knife or scraper to gently remove these materials from the surface. It’s crucial to have a clean and stable base for the new plaster to adhere to.
Filling Cracks and Holes: Next, fill any cracks or holes in the walls using a suitable filler or joint compound. Allow it to dry completely before moving on to the next step.
Sanding the Walls: Once the filler has dried, sand the walls to create a smooth and even surface. This step helps the plaster adhere better and ensures a professional finish.
Step 2: Apply the Base Coat
The base coat serves as the foundation of the plastering process. Follow these steps to apply the base coat:
Mixing the Plaster: In a large bucket, mix the plaster according to the manufacturer’s instructions. Use a paddle mixer attached to a power drill for the best results.
Applying the Base Coat: Start applying the base coat to the walls using a trowel. Work in small sections and spread the plaster evenly. Keep the thickness consistent throughout for a uniform appearance.
Drying the Base Coat: Allow the base coat to dry thoroughly before moving on to the next step. Follow the manufacturer’s guidelines for drying times.
Step 3: Apply the Skim Coat
The skim coat is the final layer of plaster that gives the walls a smooth and flawless finish. Follow these steps for the skim coat application:
Mixing the Skim Coat: Prepare the skim coat mixture in a clean bucket. Ensure it has a creamy consistency for ease of application.
Applying the Skim Coat: Using the trowel, apply the skim coat to the walls. This layer should be thin and even, covering any imperfections from the base coat. Work carefully and methodically to achieve a seamless finish.
Drying the Skim Coat: Allow the skim coat to dry completely. This may take some time, so be patient and avoid touching the surface during the drying process.
Step 4: Sand and Finish the Walls
Once the skim coat has dried, it’s time to achieve a flawless surface by sanding and finishing the walls:
Sanding the Walls: Use medium-grit sandpaper to gently sand the walls, removing any minor imperfections or uneven areas. Follow up with fine-grit sandpaper for a smooth, polished look.
Sealing the Walls: To protect the plaster and enhance its appearance, consider applying a sealant or primer. This will also make the walls easier to clean and maintain in the future.
Tips for Getting the Best Results
- Practice on a small section of the wall before tackling the entire garage to get a feel for the plastering technique.
- Keep your tools clean and free from dried plaster to ensure smooth application.
- Work in a well-ventilated area and wear appropriate safety gear throughout the process.
- Take your time and be patient; rushing can lead to mistakes and subpar results.
Encouragement to Try Plastering Your Garage Walls
Plastering your garage walls is a fulfilling and empowering DIY project that can significantly improve your garage’s appearance and functionality.
While it may seem intimidating at first, with the right materials, tools, and a little practice, you can achieve professional-looking results.
The process of plastering offers a hands-on and creative experience, allowing you to take pride in transforming your garage into a space that reflects your style and personality.
Read Also: Best Anchors for Plaster Walls
Conclusion
Plastering garage walls is a valuable skill that can elevate your garage to a new level of sophistication and usability.
By following the step-by-step guide and using the right plastering materials, tools, and techniques, you can successfully accomplish this rewarding DIY project.
Remember to take your time, pay attention to detail, and enjoy the process of turning your garage walls into a work of art. Happy plastering!