DIY Garage Paint Booth
Furniture refinishing is a journey filled with creativity and therapy, yet as I delved deeper into this world, an unexpected challenge emerged – the need for a proper painting setup.
The constant struggle of setting up curtains to prevent overspray from reaching my belongings became increasingly cumbersome.
Frustrated but determined not to compromise on design, I decided to embark on a DIY journey to create a collapsible paint booth.
Challenges Faced
Overspray Woes
Despite my meticulous curtain arrangements, the persistent issue of overspray plagued my paint projects. The fine mist of paint seemed to defy all containment efforts, infiltrating every nook and cranny.
Failed Attempts at Containment
My initial attempts at containment with curtains proved futile. The complexity of the design and the inefficiency of the setup left me grappling with frustration. It was at this point that the concept of a collapsible paint booth began to take root.
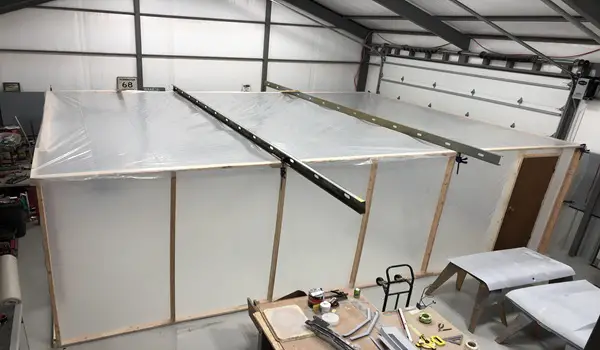
Crafting a Simple Frame
In a bid to simplify the process, I opted for a straightforward framing design. The first step involved covering the designated area with a six-mil-thick plastic sheet, ensuring it was taut and secure. Using a stapler, I meticulously affixed the plastic at both the top and bottom sections, setting the stage for the subsequent wall assembly.
Wall Assembly
Careful execution was paramount in the wall assembly phase. L brackets played a pivotal role in securing the top part of the wall to the existing framing, while stability at the bottom was ensured by two concrete screws. This initial setup laid the foundation for the collapsible feature.
Collapsible Feature
The ingenious collapsible feature was achieved through a mechanism comprising an eight-foot two by four stud cut precisely in half, complemented by three hinges per piece. This mechanism facilitated the effortless folding and unfolding of the paint booth, adding a layer of convenience to the entire setup.
Cable and Pulley System
To operationalize the collapsible feature, heavy-duty cables and pulleys were introduced. Outdoor gate wheels, designed to be spring-loaded, were strategically attached to the outer wall. This innovative addition provided a slight upward push, ensuring a smooth gliding motion as I pulled the wall in and out.
Initial Glitches
Despite successful tests during the collapsing phase, extending the collapsible paint booth presented challenges. The top and bottom of the outer wall weren’t extending simultaneously. To address this, a rigid brace was introduced for the two folding arms on either side, ensuring synchronized extension.
Complete Enclosure
With the frame structure in place, attention turned to completing the enclosure. Stapling the perimeter of the designated door area preceded the meticulous cutting of the plastic sheeting. For the door, I opted for a one-piece 3/4-inch plywood frame, achieving a delicate balance between lightness, sturdiness, and squareness.
Final Adjustments
Ensuring a smooth extension of the wall involved loosening one cable responsible for keeping the wall upright against the garage. Employing a handle on the outer wall allowed for effortless pulling and extending, with the door strategically left open to prevent negative pressure interference.
Ventilation Design
Addressing ventilation concerns, strategic slits were cut on the opposite side of the exhaust fan, creating effective intake vents. A combination of a typical HVAC filter and a fiberglass paint booth filter proved to be a cost-effective and practical solution for trapping a majority of paint particles.
Exhaust Fan Selection
For optimal air circulation within the paint booth, the DeWalt drum fan from Costco was the chosen exhaust fan, providing a cost-effective solution at approximately 7,500 cubic feet per minute (CFM).
Storage Convenience
Storing the collapsible paint booth became the highlight of this DIY project. A single pull handle, attached to both folding arms, allowed for the seamless tucking away of the plastic, making it a hassle-free process.
Demonstration and Tips
In a detailed video demonstration, I showcased the collapsible paint booth in action. For those intrigued by the project, a comprehensive list of materials and tools used was provided in the video description. Any queries were welcomed in the comment section.
Conclusion
In conclusion, this DIY collapsible paint booth emerged as a game-changer in simplifying my furniture refinishing projects.
Its efficient design, coupled with thoughtful additions like the cable and pulley system, underscored the idea that practical solutions can indeed arise from common challenges.
If you’re seeking to elevate your painting setup without unnecessary complications, this might just be the ingenious solution you’ve been looking for.
FAQs
How long did it take to build the collapsible paint booth?
The entire project took me approximately two weekends to complete.
What materials were used for the collapsible feature’s mechanism?
I used an eight-foot two by four stud cut in half and three hinges per piece.
How effective is the ventilation system in trapping paint particles?
The combination of an HVAC filter and a fiberglass paint booth filter proved highly effective in trapping a majority of paint particles.
Can I customize the size of the collapsible paint booth for a smaller workspace?
Absolutely! Adjustments to the size can be made based on your specific workspace requirements.
Where can I find the outdoor gate wheels used in the project?
Outdoor gate wheels, specifically spring-loaded ones, can be found at hardware stores or online retailers.