60 Amp Sub Panel Detached Garage
60 Amp Sub Panel Detached Garage When tackling the task of setting up a 60-amp subpanel, one must approach it […]
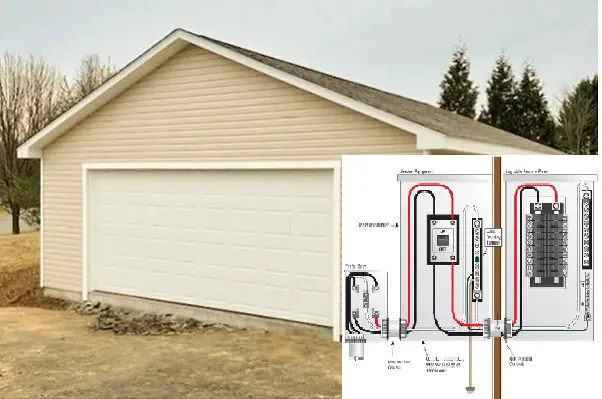
60 Amp Sub Panel Detached Garage
When tackling the task of setting up a 60-amp subpanel, one must approach it with meticulous attention to detail and a firm grasp of electrical principles. Drawing from personal experience in the field, I’ll provide insights into the critical factors to consider when embarking on a 60-amp subpanel wiring project.
What is a 60 Amp Sub Panel?
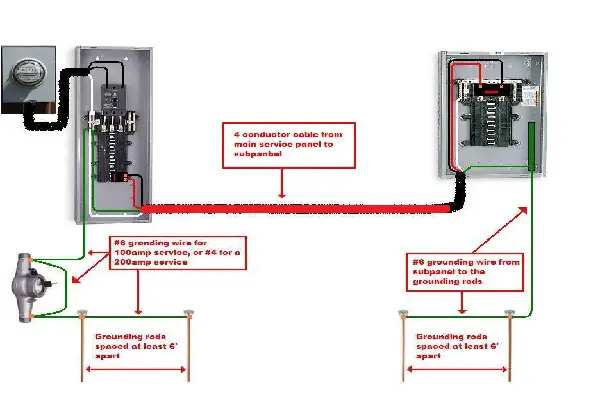
A 60 Amp sub panel is a smaller electrical panel that branches off from your main electrical panel and supplies power to a specific part of your house or property. It’s essentially like a mini-breaker box with its own set of circuit breakers, providing dedicated power distribution and overload protection for a localized area.
Here’s a breakdown of its key aspects:
Function
- Provides power to specific areas, like a detached garage, workshop, or pool equipment.
- Reduces the load on your main panel, preventing overloads and potential power outages.
- Offers dedicated protection for circuits in the sub-panel area, allowing independent troubleshooting and repairs.
Capacity
- Typically rated for 60 Amps, meaning it can handle a total continuous load of 60 Amps (7200 watts).
- Can be equipped with various circuit breakers (e.g., 15A, 20A) to cater to different appliance or equipment needs.
Main Panel Configuration
In your main panel, you’ll typically find a 60-amp back-fed breaker situated in the upper left corner. It’s important to note that if your main panel shares the same rating as your subpanel feeder, you won’t require an additional feed breaker in the main panel.
Instead, you can directly connect to the subfeed lugs at the top of the panel, which will free up two spaces. However, if there are plans to upgrade the main panel to 100 or 125 amps in the future, preserving these extra spaces for the larger main breaker becomes imperative.
Breaker Compatibility
One crucial aspect to consider is the compatibility of the breakers used in your subpanel with the panel brand. It’s essential to avoid using alien breakers, i.e., those not specifically designed for your panel. For instance, Siemens, Murray, or ITE breakers won’t fit properly in a GE panel. In such cases, it’s advisable to consider using Eaton CL breakers as suitable replacements.
Grounding and Neutrals
Proper grounding and neutral setup are vital for the safety and functionality of your subpanel. Ensure the installation of a separate ground bar, such as the GE TGK32CP, especially if there’s no bonding screw present.
To convert the subpanel into a main breaker panel, consider using a GE TQMH000 main breaker. It’s crucial to bring all neutrals to their respective breakers for AFCI/GFCI compliance. When cutting wires, ensure they are long enough to reach any location within the panel.
Ground Wire Size
The size of the ground wire plays a significant role in ensuring the safety and efficiency of your electrical setup. While you currently have an 8 AWG ground wire, it’s worth considering upgrading to 10 AWG. This size will adequately support the 60-amp panel along with two separate 15-amp circuits in the same conduit or one 20-amp circuit.
Safety Reminder
It cannot be stressed enough that safety should always be the top priority when dealing with electrical installations. If you encounter any doubts or require further assistance, it’s highly recommended to consult a qualified electrician.
Tools and Materials Required for Installation
Here are some tools and materials you’ll need to install a 60-amp sub-panel:
- Sub-panel
- Circuit breaker
- Wire connectors
- Cable ripper
- Wire stripper
- Screwdriver
- Hammer
- Measuring tape
- Level
- PVC conduit and fittings
- Electrical wires
Read Also: What Size of Wire Should I Run to My Garage?
Step-by-Step Installation Guide
Step 1: Determine Load Requirements
Before starting the installation process, assess the electrical load requirements of your detached garage. Consider factors such as the number of outlets, lighting fixtures, and power tools you plan to use. This information will help you determine the appropriate amperage for the subpanel.
Step 2: Choose Subpanel Location
Select a suitable location for the subpanel inside the detached garage. It should be easily accessible and comply with local building codes regarding clearances and ventilation. Ensure the location is dry and protected from moisture to prevent damage to the electrical components.
Step 3: Install Subpanel Feeder Cable
Run a feeder cable from the main panel in the house to the location of the subpanel in the garage. Use appropriate-sized wires based on the amperage of the subpanel and the distance of the run. Make sure to bury the cable underground or protect it with conduit if it’s exposed.
Step 4: Mount the Subpanel
Mount the subpanel securely to the wall of the garage using the provided mounting hardware. Ensure that it is level and properly grounded according to the manufacturer’s instructions.
Step 5: Connect the Feeder Cable
Terminate the feeder cable wires into the appropriate terminals in the subpanel. Follow the wiring diagram provided with the subpanel to ensure correct connections. Tighten the connections securely to prevent any loose connections that could lead to overheating.
Step 6: Install Circuit Breakers
Install the appropriate circuit breakers in the subpanel to protect the individual circuits. Divide the circuits based on their intended use, such as lighting, outlets, and specialized equipment. Label each breaker to easily identify its corresponding circuit.
Step 7: Test the Subpanel
Once the subpanel is fully wired and all connections are secure, test the circuits to ensure they are functioning correctly. Use a multimeter to check for voltage and continuity, and troubleshoot any issues that arise.
Step 8: Final Inspection
Schedule a final inspection with your local building department to ensure that the subpanel installation meets all code requirements. Address any feedback or concerns raised by the inspector to ensure compliance and safety.
Maintenance Wisdom for a Reliable Sub-Panel:
- Keep the sub-panel dry and clean to ensure longevity.
- Regularly inspect wires and connections for signs of wear and tear.
- Schedule routine maintenance checks with a qualified electrician.
- Adhere to the manufacturer’s guidelines for optimal sub-panel performance.
DIY Installation or Professional Assistance?
While a knowledgeable individual can undertake a 60-amp sub-panel installation, hiring a licensed electrician is recommended to guarantee adherence to safety standards.
Cost Insights
The installation cost of a 60-amp sub-panel varies based on factors such as sub-panel size, wiring length, and installation complexity. On average, expect a range of $500 to $1000.
Here are some additional resources that you may find helpful:
- Mike Holt’s Forum: https://forums.mikeholt.com/threads/detached-garage-sub-panel.118032/
- The Garage Journal: https://www.garagejournal.com/forum/threads/sub-panel-for-garage.347064/
- DIY Stack Exchange: https://diy.stackexchange.com/questions/236611/60-amp-sub-panel-to-external-garage-from-house-overhead-drop-wire-type
Conclusion
Embarking on the journey to electrify your detached garage becomes an empowered endeavor with the installation of a 60-amp sub-panel. By prioritizing critical considerations such as adherence to local codes, meticulous assessment of power requirements, and ensuring proper wiring, you set the stage for a safe, efficient, and reliable power supply in your garage.
The key to success lies not just in the decision to install a 60-amp sub-panel but in the methodical execution of each step. As you transform your detached garage into a power hub, the strategic location selection, appropriate sub-panel sizing, and seamless wiring connections form the foundation of a robust electrical infrastructure.


