If you’re planning to run electricity to your garage, one of the most critical decisions you’ll need to make is what size of wire to use. Using the wrong wire size could result in electrical hazards, such as overheating, fires, and damage to your appliances.
Therefore, it’s essential to choose the right size of wire that can handle the load and voltage requirements of your garage’s electrical system. This article will guide you through the factors you need to consider when choosing the right wire size and how to calculate the wire size required for your garage.
Understanding Wire Gauge
Wire gauge refers to the thickness of the wire, which is measured in American Wire Gauge (AWG). The smaller the wire gauge, the thicker the wire.
The wire gauge also determines the amount of electrical current the wire can handle. Electrical codes specify the minimum wire size required for a given load, voltage, and circuit breaker size.
Factors to Consider When Choosing the Right Wire Size
1. The Load Requirements of Your Garage
The first factor to consider when choosing the right wire size for your garage is the electrical load requirements.
The load requirements refer to the amount of power needed to operate your garage’s electrical appliances, such as lighting, power tools, and charging stations. You should calculate the total wattage of all your electrical appliances to determine the load requirements.
2. The Distance Between the Main Panel and the Garage
The distance between the main electrical panel and the garage affects the voltage drop, which is the reduction of voltage that occurs when electricity travels over a long wire.
The longer the distance, the higher the voltage drop, which can cause overheating and power loss. Therefore, you’ll need to choose a thicker wire size for longer distances to compensate for the voltage drop.
3. The Circuit Breaker Size
The circuit breaker is the safety device that protects your electrical system from overloading and short circuits. The circuit breaker size depends on the wire size and the load requirements of your garage. The wire size must be compatible with the circuit breaker size to prevent electrical hazards.
4. The Type of Wire Insulation
Wire insulation refers to the protective covering that surrounds the wire. The wire insulation must be suitable for the environment where the wire will be installed. For example, if your garage is exposed to moisture or chemicals, you’ll need a wire with waterproof and chemical-resistant insulation.
Calculating the Wire Size Required for Your Garage
To calculate the wire size required for your garage, you’ll need to consider the load requirements, distance, circuit breaker size, and wire insulation. Here’s how to do it:
- Determine the total wattage of all your electrical appliances.
- Calculate the amperage by dividing the total wattage by the voltage. For example, if your total wattage is 5,000 watts, and your voltage is 240 volts, your amperage is 20.83A (5000/240=20.83).
- Determine the circuit breaker size by multiplying the amperage by 1.25. For example, if your amperage is 20.83A, your circuit breaker size should be 26A (20.83 x 1.25=26.04).
- Calculate the voltage drop by multiplying the amperage by the wire length and the resistance of the wire. You can use online voltage drop calculators to make this process easier.
- Choose the wire size that meets or exceeds the minimum wire size required by the electrical codes for your circuit breaker size and load requirements.
Recommended Wire Sizes for Garages
Here are some recommended wire sizes for garages based on the load requirements and distance:
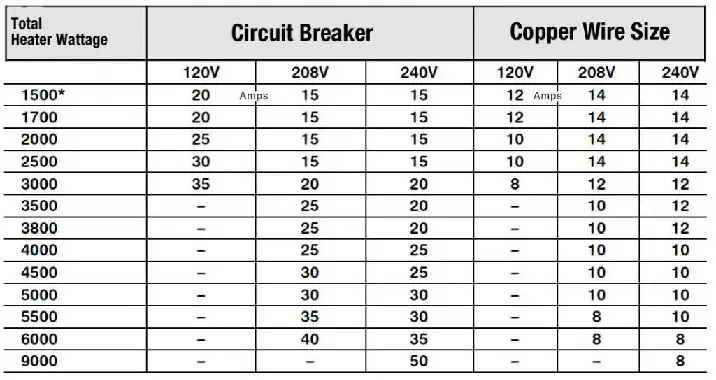
- For a load requirement of up to 15 amps and a distance of up to 50 feet, use 14 AWG wire.
- For a load requirement of up to 20 amps and a distance of up to 100 feet, use 12 AWG wire.
- For a load requirement of up to 30 amps and a distance of up to 100 feet, use 10 AWG wire.
- For a load requirement of up to 40 amps and a distance of up to 100 feet, use 8 AWG wire.
- For a load requirement of up to 50 amps and a distance of up to 100 feet, use 6 AWG wire.
Note that these recommendations are only guidelines, and you should always consult the electrical codes and regulations in your area before choosing the wire size for your garage.
How to Wire a Garage
Wiring a garage can seem like a daunting task, but with the right guidance, it can be done safely and efficiently. In this article, we will provide a comprehensive guide on how to wire a garage. We will cover the tools and materials needed, safety considerations, and step-by-step instructions on how to wire your garage.
Tools and Materials Needed
Before starting any electrical wiring project, it is important to have the right tools and materials. The following is a list of essential tools and materials for wiring a garage:
- Electrical cable
- Circuit breaker panel
- Outlets and switches
- Wire connectors
- Wire strippers
- Cable staples
- Screwdrivers
- Hammer
- Pliers
- Electrical tape
- Voltage tester
Safety Considerations
When working with electricity, safety should always be a top priority. Here are some safety considerations to keep in mind when wiring a garage:
- Always turn off the power to the circuit you are working on before starting any wiring project.
- Never work on electrical systems in wet or damp conditions.
- Wear appropriate protective gear, such as safety glasses and gloves.
- Make sure all electrical cables and wires are properly insulated and protected.
- Always follow local electrical codes and regulations.
Planning and Preparation
Before starting the wiring process, it is crucial to plan and prepare adequately. The following are some steps to follow:
Determining the Electrical Load
The first step is to determine the electrical load that the garage requires. The electrical load is the total amount of power needed to operate all the electrical devices and appliances in the garage. This information will help you determine the size of the circuit breaker panel and electrical cable needed.
Creating a Wiring Diagram
After determining the electrical load, create a wiring diagram that outlines the electrical circuits and outlets. The diagram should include the location of the electrical service panel, outlets, switches, and light fixtures.
Installing the Electrical Service Panel
The electrical service panel is the central hub for all the electrical circuits in your garage. Follow these steps to install the panel:
- Choose the location of the electrical service panel.
- Install the panel onto a solid surface using screws or bolts.
- Connect the electrical cable to the panel and the main power source.
- Install the circuit breakers.
Running the Electrical Cable
The electrical cable is responsible for carrying electrical power from the service panel to the outlets, switches, and light fixtures. Follow these steps to run the electrical cable:
- Cut the electrical cable to the appropriate length.
- Use cable staples to secure the cable to the wall or ceiling.
- Use wire connectors to connect the cable to the outlets, switches, and light fixtures.
Installing Outlets and Switches
Outlets and switches are necessary for powering appliances and turning on and off light fixtures. Follow these steps to install them:
- Choose the location of the outlets and switches.
- Cut holes in the wall or ceiling where the outlets and switches will be installed.
- Connect the electrical cable to the outlets and switches using wire connectors.
- Install the outlets and switches into the holes and secure them with screws.
Connecting the Light Fixtures
Light fixtures can add visibility and ambiance to your garage workspace. Follow these steps to connect them:
- Choose the location of the light fixtures.
- Cut holes in the ceiling where the light fixtures will be installed.
- Connect the electrical cable to the light fixtures using wire connectors.
- Install the light fixtures into the holes and secure them with screws.
Final Checks and Testing
After completing the installation process, it is important to perform final checks and testing to ensure that everything is working properly. Follow these steps:
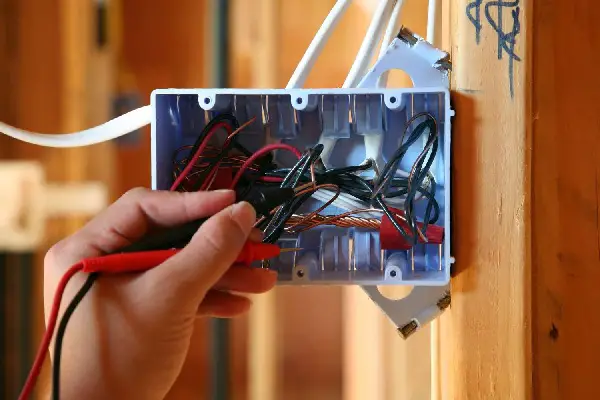
- Use a voltage tester to check the electrical connections for any signs of electrical current.
- Turn on the circuit breaker and test each outlet and switch.
- Turn on the light fixtures to ensure that they are working correctly.
Conclusion
Selecting the appropriate wire size for your garage is a crucial step to ensure the safety and effectiveness of your electrical system. To determine the right wire size, you need to consider various factors, such as load requirements, distance, circuit breaker size, and wire insulation.
Fortunately, there is a calculation method you can use to determine the correct wire size for your garage. It’s essential to follow the electrical codes and regulations in your area to avoid any electrical hazards that may arise.
Wiring a garage might appear to be a challenging job, but with proper planning and preparation, it can be accomplished safely and efficiently. It is critical to adhere to safety guidelines and regulations at all times and use the appropriate tools and materials for the task.