Garage door sensor issues can be frustrating, causing doors to stop unexpectedly, with blinking lights indicating a problem. In this guide, I’ll explore a practical solution to bypassing garage door sensors, sharing insights into the common issues and a step-by-step process to address them.
Understanding the Problem
1. Initial Troubles
Door not going down properly
One of the initial challenges faced with the garage door was its erratic behavior, particularly in its descent. Instead of smoothly closing, it exhibited irregularities, causing inconvenience and potential safety concerns.
Blinking light on the overhead motor unit
A significant red flag appeared in the form of a blinking light on the overhead motor unit. This blinking indicated an issue that needed attention. Understanding the source of this problem became imperative for effective resolution.
2. Sensor Functionality
Two sensors at the bottom of the doorway
Garage doors are equipped with a safety mechanism involving two sensors strategically positioned at the base of the doorway. These sensors work in tandem to create an invisible beam that spans the door’s path.
Creating a beam to detect obstacles
The purpose of these sensors is to generate a beam of light that stretches across the door’s opening. This beam acts as a safety measure, detecting any obstacles or obstructions in the door’s trajectory. If an object interrupts this beam while the door is in motion, it triggers an automatic reversal to prevent accidents.
3. Possible Causes
Sensor misalignment
One potential cause of the malfunction was the misalignment of the sensors. If these sensors were not correctly positioned to create a seamless beam, it could lead to inaccurate readings, triggering unnecessary halts in door movement.
Need for sensor adjustment
Regular wear and tear or environmental factors might necessitate periodic adjustments to maintain the optimal functioning of the sensors. Failure to adjust them appropriately could contribute to operational issues.
Internal unit issues
Beyond the sensors, the root cause of the problem might extend to internal issues within the garage door unit itself. Components such as wiring, circuitry, or the motor might be experiencing malfunctions, adding complexity to the troubleshooting process.
Evaluating Your Situation
4. Perfect Sensor Operation
Sensors in good condition
A critical aspect of troubleshooting the garage door issues involved a thorough assessment of the sensor health. In this case, the sensors were found to be in optimal condition, functioning as intended. They emitted the necessary signals and responded appropriately during testing, ruling out any inherent malfunction in the sensor units.
Regular adjustments made
To ensure seamless operation, regular adjustments were diligently performed on the sensors. This proactive approach aimed to maintain the precision of the sensor alignment, preventing potential disruptions in the door’s functioning. Despite these efforts, the persisting issue hinted at a deeper problem that necessitated a closer examination.
5. Sunlight Interference
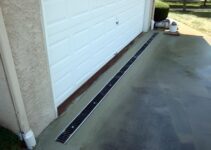
Sensor placement susceptible to sunlight
A crucial discovery in the evaluation process was the vulnerability of the sensor placement to direct sunlight. The sensors, mounted on brackets attached to the rail, faced south. This positioning made them susceptible to the intrusion of sunlight, particularly during specific times of the day.
Impacting signal transmission
The interference of sunlight with the sensor signal transmission became apparent as a significant contributing factor to the garage door’s malfunction. Sunlight hitting the sensors disrupted the accuracy of the beam, leading to false readings and triggering the safety mechanism unnecessarily. Recognizing this environmental challenge was pivotal in determining the appropriate solution.
6. Analyzing Sensor Placement
Brackets on the rail facing south
The decision to mount the sensor brackets on the rail with a south-facing orientation was a key element affecting their performance. The southern exposure meant that the sensors were consistently exposed to direct sunlight, creating conditions conducive to signal disruption.
Sunlight obstructing sensor signal
The sunlight obstructing the sensor signal became a critical point of concern. This interference not only affected the sensors’ ability to communicate effectively but also compromised the overall reliability of the garage door’s safety features. A solution that addressed this specific environmental challenge was imperative for restoring the door’s seamless functionality.
Choosing a Solution
7. Possible Fixes
Moving sensors away from direct sunlight
One potential solution to mitigate the impact of direct sunlight on the sensors involved relocating them to a position less exposed to the sun’s rays. This fix aimed to create an environment where the sensors could operate without interference, ensuring the reliability of the garage door’s safety features.
Addressing challenges with alternative solutions
Recognizing the complexity of the situation, alternative solutions were explored to tackle the challenges posed by sunlight interference. This could involve the implementation of shields or hoods to protect the sensors, allowing them to function optimally without being affected by external factors.
8. Decision-Making Process
Considering the drawbacks of moving sensors
While moving the sensors away from direct sunlight appeared to be a straightforward solution, it came with its set of drawbacks. The new sensor placement might be susceptible to physical obstructions or environmental elements, potentially compromising their effectiveness. Additionally, the relocation process could be labor-intensive and might not be a feasible solution for everyone.
Weighing the risks and benefits
In the decision-making process, it was crucial to carefully weigh the risks and benefits associated with each potential solution. Balancing the desire to eliminate sunlight interference with the practical considerations of sensor relocation required a thoughtful evaluation of the potential consequences and advantages. This decision-making process ensured that the chosen solution aligned with the specific needs and circumstances of the situation.
DIY Bypass Procedure
9. Preparing for the Modification
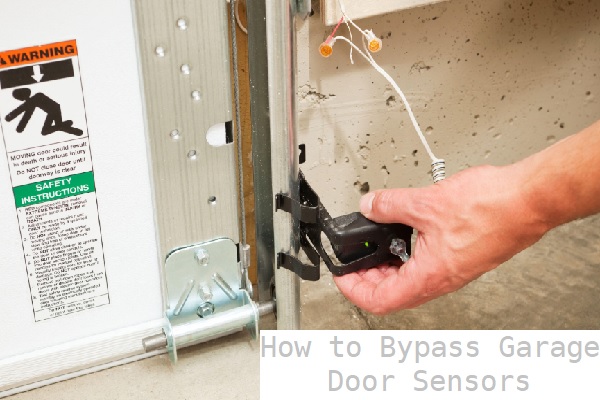
Locating the sensor brackets
The first step in the DIY bypass procedure involves locating the sensor brackets. These are typically positioned on each side of the garage door, approximately 10 to 12 inches above the floor. Identifying their precise placement is essential for a seamless modification process.
Understanding the wiring
Before proceeding, a comprehensive understanding of the sensor wiring is crucial. Familiarize yourself with the connection points, ensuring you can confidently navigate the disconnection and reconnection process. This step sets the foundation for a smooth modification without unintended complications.
10. Disconnecting Sensors
Cutting the wire close to the sensor
Carefully cut the wires close to the sensors, ensuring a clean separation. This step marks the beginning of the bypass process, allowing for the isolation of the sensors from the garage door system. The cut should leave enough wire length for future reinstallation if the need arises.
Leaving room for future reinstallation
By preserving a sufficient length of wire, you create the flexibility to reinstate the sensors in their original position if circumstances change. This foresight ensures that the modification is reversible, providing an added layer of adaptability to the garage door setup.
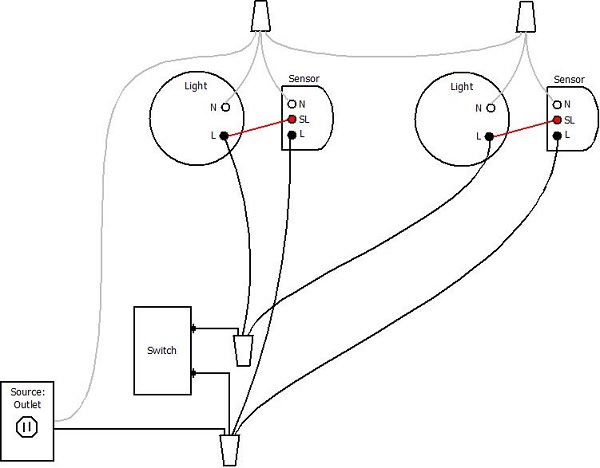
11. Garage Door Opener Wiring
Identifying the wires for sensors
Locate the wires associated with the sensors in the garage door opener unit. Typically, there are two sets of wires – one for the door button and the other for the sensors. Identify the wires designated for the sensors, ensuring accuracy during the subsequent steps.
Ensuring safety during the procedure
Prioritize safety when dealing with the garage door opener wiring. Disconnect power to the opener unit to prevent electrical accidents. This precautionary measure guarantees a secure environment for handling the wires and making the necessary adjustments.
12. Creating Pigtails
Twisting solid white and striped wires
Prepare pigtails by twisting together one solid white wire and one wire with a black stripe or other distinguishing mark. This combination mirrors the original sensor wiring configuration, facilitating a seamless integration with the garage door opener unit.
Preparing the connections
Ensure the twisted wires are securely connected and insulated to prevent any short circuits. This meticulous preparation sets the stage for a reliable and stable connection, maintaining the integrity of the garage door system.
13. Connecting Sensors
Joining sensor wires to the opener
Connect the prepared pigtails to the designated sensor wires on the garage door opener unit. Adhere to the color-coding or markings to guarantee correct pairing. This step establishes a new connection that mimics the sensor functionality without the physical presence of the sensors themselves.
Ensuring proper alignment
During the connection process, ensure the alignment of the newly created sensor circuit. Proper alignment is essential for accurate signal transmission, maintaining the effectiveness of the garage door safety features.
14. Securing Sensors
Taping sensors together
Secure the sensors by taping them together. This step ensures that the sensors maintain a consistent and stable position, emulating the beam formation despite being physically separated. The tape provides a reliable hold without compromising the effectiveness of the DIY bypass.
Safely placing them above the door
Position the taped sensors above the garage door in a location that avoids potential obstructions. This placement guarantees continued functionality while addressing the initial issue of sunlight interference. The careful placement ensures that the modified setup aligns with safety standards.
Operation and Safety Concerns
15. Testing the Modified System
Ensuring the garage door functions
After completing the DIY bypass procedure, a critical step is to test the modified garage door system. Activate the door and observe its movement, ensuring it operates smoothly without unexpected interruptions. This test validates the effectiveness of the bypass in addressing the sunlight interference issue.
Understanding the limitations
While the modified system should exhibit proper functionality, it’s essential to acknowledge any limitations introduced by the bypass. Recognize that, without the original sensor setup, the garage door may lack the ability to detect obstacles in its path. Understanding these limitations helps users make informed decisions regarding the continued use of the modified system.
16. Safety Considerations
Recognizing the absence of sensor beams
A key safety consideration post-bypass is the absence of the sensor beams that previously detected obstacles in the door’s path. Users must be aware that the door no longer possesses this specific safety feature. Understanding this change is crucial for responsible usage and avoiding potential hazards.
Weighing the potential risks
In the absence of sensor beams, there is a need to carefully weigh the potential risks associated with the modified garage door system. Consider factors such as the absence of automatic reversal upon detecting obstacles. This evaluation ensures that users are fully informed about the safety implications and can make conscious choices aligned with their risk tolerance.
Conclusion
In facing the challenges posed by sunlight interference with my garage door sensors, the decision to bypass them emerged as a practical and effective solution. While this approach might not be universally applicable, it proved to be a viable fix tailored to my specific circumstances.
The modification successfully addressed the persistent issue of sensor malfunction caused by direct sunlight exposure. By relocating the sensors and implementing alternative measures, the garage door now functions seamlessly without the hindrance of false readings or unnecessary halts.
However, it’s crucial to emphasize that the decision to bypass garage door sensors should be approached with careful consideration. The modification introduces changes to the safety features of the door, particularly the absence of sensor beams that traditionally detected obstacles. Users must recognize and understand the implications of this adjustment to make informed choices aligned with their unique situation.