Checkered Garage Floors
Your garage, often overlooked and underestimated, can become more than just a space for parking your car. With a checkered garage floor, you can transform this utilitarian area into a stylish, organized, and inviting space.
In this article, I will delve into the world of checkered garage floors, exploring their benefits, various types, and how to choose the right one for your needs.
What is a Checkered Garage Floor?
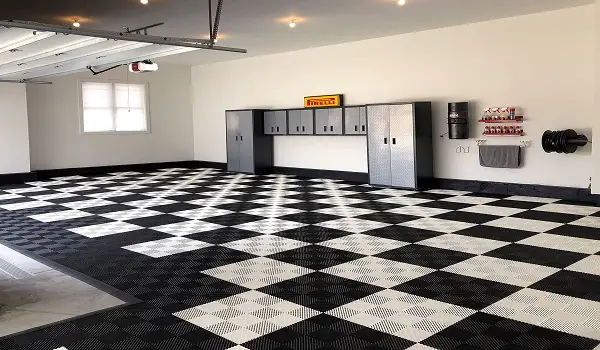
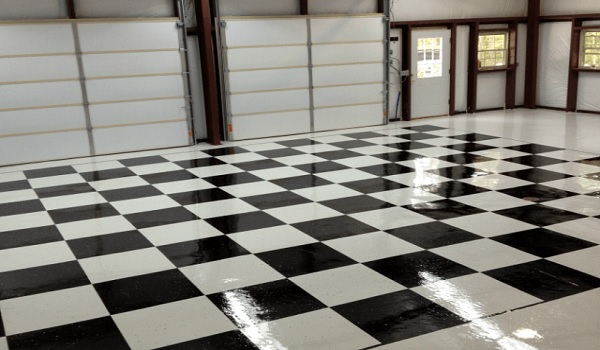
A checkered garage floor is exactly what it sounds like – a garage floor adorned with a classic checkered pattern.
This pattern, often consisting of black and white squares, creates a visually appealing and timeless look.
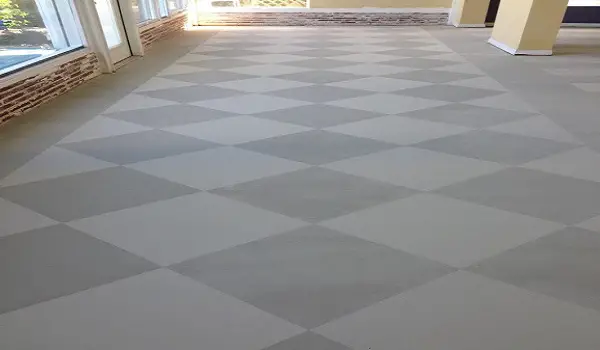
Checkered garage floors can come in various color combinations, allowing you to express your unique style.
Benefits of a Checkered Garage Floor
The decision to invest in a checkered garage floor is more than just a decorative choice; it’s a functional one. Here are some of the key advantages:
- Durability: Checkered garage floors are built to withstand the rigors of daily use. Whether you’re parking your car, working on DIY projects, or creating a home gym, they can take it all.
- Easy to Clean: Maintaining a checkered garage floor is a breeze. Spills, stains, and dirt can be wiped away effortlessly, ensuring that your garage stays looking pristine.
- Non-slip Surface: Safety should always be a priority. The checkered pattern provides a non-slip surface, reducing the risk of accidents, especially in a busy garage.
- Enhanced Lighting: The reflective quality of checkered garage floors can brighten up your space. This is especially valuable if your garage doesn’t have ample natural light.
Types of Checkered Garage Floors

When it comes to checkered garage floors, you have several options to choose from:
- Checkered Garage Floor Tiles: These tiles are easy to install and come in various materials, including PVC, vinyl, and interlocking polypropylene. They are versatile, allowing you to create custom designs and patterns.
- Checkered Garage Floor Epoxy: Epoxy coatings provide a seamless and glossy finish. They are highly durable and can withstand heavy traffic. With epoxy, you can achieve a sleek, modern look.
- Checkered Garage Floor Paint: If you’re looking for an affordable way to update your garage floor, paint is an excellent choice. It offers you the freedom to create your checkered pattern and color scheme.
How to Choose the Right Checkered Garage Floor for You
Selecting the right checkered garage floor is crucial to ensure it meets your specific needs and preferences. Let’s break down the process into three essential steps:
Planning Your Checkered Garage Floor
- Measuring Your Garage Floor: Accurate measurements are the foundation of any successful project. Measure the dimensions of your garage to determine the amount of materials you’ll need.
- Choosing a Design: Decide on the pattern and colors you want. Classic black and white is always a popular choice, but don’t be afraid to get creative and personalize your garage.
- Selecting Materials: Based on your design, choose the appropriate material. If you prefer tiles, decide whether you want PVC, vinyl, or polypropylene. If epoxy or paint is your choice, make sure you have the right supplies.
Preparing Your Garage Floor
- Cleaning the Floor: A clean surface is essential for adhesion. Thoroughly clean your garage floor, removing all dirt, oil, and other contaminants.
- Repairing Any Damage: Inspect your floor for cracks and imperfections. Repair any damage using suitable products to ensure a smooth surface.
- Applying a Primer (If Necessary): Depending on your chosen material, you may need to apply a primer to enhance adhesion. Follow the manufacturer’s guidelines for this step.
Installing Your Checkered Garage Floor
When it comes to transforming your garage with a stylish checkered pattern, the installation phase is where your vision truly takes shape.
Depending on the material you’ve chosen for your checkered garage floor, the installation process may vary. Let’s explore the installation of checkered garage floors using three popular options: tiles, epoxy coatings, and paint.
Installing Checkered Garage Floor Tiles
If you’ve opted for checkered garage floor tiles, you’re in for a relatively straightforward installation process. Here’s a step-by-step guide:
- Plan Your Layout: Before you start, carefully plan your layout. Decide where you want to begin and ensure that the checkered pattern aligns with your design. Start at the center of the garage and work your way out for a symmetrical look.
- Clean the Subfloor: Make sure the subfloor is clean and free from dust and debris. A clean surface ensures proper adhesion. If necessary, use a concrete cleaner to remove any stubborn stains or contaminants.
- Apply Adhesive: Depending on the type of tiles you’ve chosen, you’ll need to apply an adhesive to the subfloor. Follow the manufacturer’s instructions for the adhesive application. In most cases, you’ll use a trowel to spread the adhesive evenly.
- Lay Out the Tiles: Begin laying out your tiles according to your design. Align them carefully, ensuring the checkered pattern is consistent and square. Interlocking tiles should be fitted together snugly.
- Trim Edges: As you approach the edges of the garage, you may need to trim tiles to fit. Measure and cut the tiles using a utility knife or a tile cutter for a clean finish.
- Press Firmly: After laying each tile, press it firmly to ensure proper bonding with the adhesive. A rubber mallet can be handy for this task.
- Allow for Set Time: Let the installed tiles set for the recommended time specified by the adhesive manufacturer. This curing time ensures that the tiles bond securely to the subfloor.
Installing Checkered Garage Floor Epoxy
Epoxy coatings offer a glossy and durable finish, but the installation process requires careful attention to detail. Here’s how to apply epoxy to create your checkered garage floor:
- Prepare the Garage: Start by clearing the garage of any obstacles, including cars, tools, and debris. Sweep and vacuum the floor to remove any dust and dirt.
- Etch the Surface: To promote adhesion, it’s often necessary to etch the concrete surface. This can be done using an etching solution or mechanically with a floor grinder. Follow the manufacturer’s guidelines for the specific epoxy product you’re using.
- Mix the Epoxy: Epoxy coatings come in two parts that need to be mixed before application. Typically, you’ll mix a resin and a hardener in the specified ratios. Use a drill with a mixing paddle for thorough blending.
- Apply the Base Coat: Start by applying a base coat of epoxy to the garage floor. Use a roller or a squeegee to ensure even coverage. This base coat will act as an adhesive for your checkered pattern.
- Map Out Your Design: Before the epoxy dries, you need to plan and mark your checkered design on the floor. This can be done using tape or chalk lines. Accuracy is crucial to achieve a well-defined pattern.
- Apply the Checkered Pattern: After marking your pattern, apply the contrasting epoxy color to create the checkered effect. Pour the epoxy in sections and use a roller to distribute it evenly.
- Add Optional Toppings: If you want a textured surface, consider adding decorative flakes or quartz crystals to the wet epoxy. This not only enhances the aesthetics but also provides extra traction.
- Allow for Curing: Epoxy coatings take time to cure. The specific curing time will depend on the product you’ve chosen. Ensure that the garage remains undisturbed during this period to allow the epoxy to set properly.
Installing Checkered Garage Floor Paint
For those who prefer a cost-effective approach to a checkered garage floor, paint is a great option. Follow these steps to paint your garage floor with a checkered pattern:
- Plan Your Design: Just like with tiles and epoxy, planning is key. Decide on the size and layout of your checkered pattern. You may want to start at the center of the garage to ensure symmetry.
- Clean the Floor: Clean the garage floor thoroughly, removing any dirt, dust, or oil stains. A clean surface will help the paint adhere properly.
- Prime the Floor: To improve paint adhesion and durability, consider applying a concrete primer. Allow the primer to dry according to the manufacturer’s instructions.
- Map Out the Pattern: Use painter’s tape or chalk lines to map out your checkered pattern. Measure and mark the squares precisely to ensure a neat and even design.
- Paint the First Color: Paint one of the colors in your design within the marked squares. Use a roller or brush to apply the paint evenly. Allow this coat to dry completely before moving on to the next step.
- Paint the Second Color: Once the first color is dry, carefully paint the second color in the remaining squares. Again, ensure even coverage and straight lines.
- Remove the Tape: Before the paint is fully dry, gently remove the painter’s tape. This helps achieve clean lines without any bleed-over.
- Allow for Drying: Let the paint dry completely before subjecting the floor to any traffic or heavy use. The drying time may vary depending on the paint type and environmental conditions.
With these installation methods, you can turn your garage floor into a checkered masterpiece, adding both style and functionality to your space. Whether you choose tiles, epoxy, or paint, your checkered garage floor is sure to become a standout feature of your home.
Remember, proper installation is key to ensuring the longevity and visual appeal of your checkered garage floor. Following manufacturer guidelines and taking your time during the process will lead to the best results. So, roll up your sleeves and get ready to transform your garage into a space that’s as beautiful as it is practical.
Conclusion
Your garage is a valuable part of your home, and with a checkered garage floor, it can be both functional and visually appealing. To maintain the beauty and integrity of your newly updated space, here are some essential tips:
- Regularly clean the floor to remove dirt and stains.
- Address any damage promptly to prevent further deterioration.
- Be cautious when moving heavy objects to prevent scratching or chipping.
- Avoid using harsh chemicals that can damage the finish.
- Consider adding floor mats or rugs to protect high-traffic areas.
A checkered garage floor is a timeless choice that combines style with practicality. It’s a versatile option, perfect for both the classic car enthusiast and the DIY enthusiast. So, why wait? Transform your garage with a checkered garage floor and experience the difference for yourself.
FAQ
What is the cost of a checkered garage floor?
The cost of a checkered garage floor can vary significantly depending on the type of material you choose. Garage floor tiles typically range from $2 to $5 per square foot, while epoxy coatings can cost between $3 and $12 per square foot. Garage floor paint is the most budget-friendly option, with prices ranging from $1 to $2 per square foot.
Can I install a checkered garage floor as a DIY project?
Yes, many homeowners successfully install checkered garage floors as a DIY project. The choice of material will influence the complexity of the installation. Garage floor tiles are generally the most straightforward, while epoxy and paint may require more skill. With careful planning and following the manufacturer’s instructions, DIY installation is achievable.
How can I find more checkered garage floor ideas?
To explore various checkered garage floor ideas, you can browse home improvement magazines, websites, or social media platforms like Pinterest and Instagram. These sources often feature inspiring photos and projects that can help you envision your ideal checkered garage floor.
What are the most popular color combinations for checkered garage floors?
While black and white checkered garage floors are a classic choice, you can get creative with color combinations. Some popular alternatives include red and white, blue and gray, or even custom patterns that match your personal style and preferences.