How Many Turns for Garage Door Spring
One of the most common questions we receive on our tech line is, “How many turns on a garage door spring?”
Well, the answer to this question depends on the height of your garage door and the diameter of your drums.
Let’s dive into the details to find out the correct number of turns required for your specific garage door.
Understanding Drum Diameter
Before we delve into the number of turns, let’s talk about drum diameter. For most residential garage doors, the industry standard is a 4-inch drum.
When measuring the cross-section of the drum, it comes out to about four and a quarter inches, which, after accounting for the slip on the end, is approximately four inches.
Determining Turns Based on Door Height
Now, let’s get into the specifics of how many turns you should put on your spring based on the height of your garage door.
For a 7-foot tall door, you’ll need seven and three-quarters turns on the spring. To simplify the process, we recommend using quarter turns, making it easier to keep track.
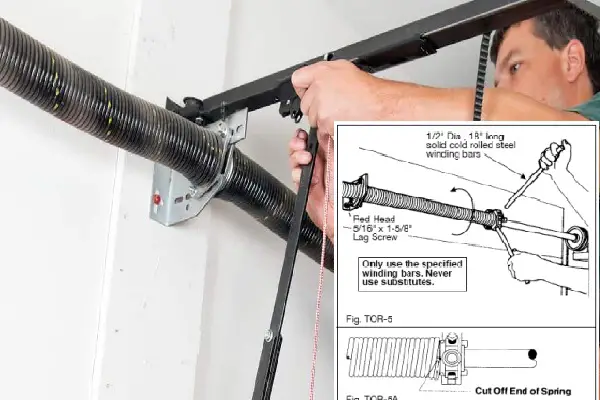
A quarter turn means raising your torsion bar slightly, inserting your bar into the spring, and then raising it up to complete one quarter turn.
For a 7-foot door, you would perform 31 quarter turns on the spring. To be more precise, we have a handy chart on our website that provides information about how many turns to put on your spring depending on the height of your door.
For instance, a 7-foot 6-inch height door would require 32 quarter turns, as indicated by the chart. Remember, before you begin, make sure your door is secured in place, either with a lock or by using vise grips in the track to prevent any unpredictable movements.
Read Also: Door Height Garage Door Torsion Spring Chart
Balancing the Door
Once you’ve completed the recommended number of turns, it’s time to check if the door is properly balanced. Start by raising the door with the lock still engaged, if applicable.
Ideally, the door should stay in place without any sudden movements. If the door feels too heavy at the bottom or too snappy at the top, you may need to adjust the spring tension.
If adjustments are necessary, we advise removing one or two quarter turns at a time for safety reasons. Safety always comes first, and we want to avoid any potential accidents.
Ensure that the cables remain tightly wound around the drum as you raise the door to its fully open position.
Perfectly Balanced Garage Door
A perfectly balanced garage door is essential for smooth and safe operation.
On our website, you’ll find a comprehensive chart that covers garage doors ranging from six to eight feet tall, helping you determine the right number of turns for your specific door.
If you ever find yourself unsure about the number of turns or have any questions related to your garage door springs, don’t hesitate to give our tech line a call.
Our team of experts is always here to assist you and ensure your garage door operates perfectly.
Read Also: Garage Door Torsion Spring Size Calculator
How many turns on a double spring garage door
The number of turns on a double spring garage door is four quarter turns per foot of door height, plus an extra two turns. So, for example, a 7-foot door would have 29 turns on each spring.
Here are the steps on how to wind a double spring garage door:
- Gather your tools. You will need a winding rod, a socket wrench, and a chalk line.
- Measure the height of your garage door. You can do this by measuring from the top of the door to the bottom of the track.
- Calculate the number of turns needed. Multiply the height of your door by 4.5, then add 2. This is the total number of turns needed for both springs.
- Draw a chalk line on each spring. This will help you keep track of how many turns you have made.
- Wind each spring one quarter turn at a time. Be sure to keep the winding rod in place as you wind the spring.
- Continue winding the springs until you have reached the desired number of turns.
- Once you have reached the desired number of turns, tighten the set screws on each spring with a socket wrench.
It is important to note that winding garage door springs is a dangerous task. If you are not comfortable doing it yourself, it is best to hire a professional.
how many turns on a 10′ garage door spring
For a 10-foot garage door spring, you will typically need 35 quarter turns or 14 full turns to achieve the appropriate tension. This adjustment is necessary to balance the door properly and ensure smooth and safe operation.
Number of Turns for the Spring:
- 35 quarter turns
- 14 full turns
How many turns on a 12 ft garage door spring
For a 12-foot garage door spring, you will typically need 39 quarter turns or 15 full turns to achieve the appropriate tension. This adjustment is crucial to properly balance the door and ensure it operates smoothly and safely.
Number of Turns for the Spring:
- 39 quarter turns
- 15 full turns
how many turns on a 14 ft garage door spring
For a 14-foot garage door spring, you will typically need 43 quarter turns or 17 full turns to achieve the appropriate tension. Properly balancing the door through these adjustments is essential for smooth and safe operation.
Number of Turns for the Spring:
- 43 quarter turns
- 17 full turns
how many turns on a 16 ft garage door spring
For a 16-foot garage door spring, you will typically need 47 quarter turns or 19 full turns to achieve the appropriate tension. Balancing the door with the correct number of turns is crucial for the smooth and safe operation of the garage door.
Number of Turns for the Spring:
- 47 quarter turns
- 19 full turns
how many turns on a 16×7 garage door spring
For a 16×7 garage door, you will typically need 49 quarter turns or approximately 19.75 full turns to achieve the appropriate tension on the garage door spring. Properly balancing the door with the correct number of turns is essential for its smooth and safe operation.
Number of Turns for the Spring:
- 49 quarter turns
- 19.75 full turns
how many turns on a 7ft garage door spring
For a 7-foot garage door, you will typically need 29 quarter turns or 11 full turns to achieve the appropriate tension on the garage door spring. Properly balancing the door with the correct number of turns is crucial for smooth and safe operation.
Number of Turns for the Spring:
- 29 quarter turns
- 11 full turns
how many turns on a 8ft garage door spring
For an 8-foot garage door, you will typically need 31 quarter turns or approximately 12.25 full turns to achieve the appropriate tension on the garage door spring. Balancing the door with the correct number of turns is essential for smooth and safe operation.
Number of Turns for the Spring:
- 31 quarter turns
- 12.25 full turns
how many turns on a 9 ft garage door spring
For a 9-foot garage door, you will typically need 33 quarter turns or approximately 13.25 full turns to achieve the appropriate tension on the garage door spring. Properly balancing the door with the correct number of turns is crucial for its smooth and safe operation.
Number of Turns for the Spring:
- 33 quarter turns
- 13.25 full turns
Conclusion
In conclusion, the number of turns required for your garage door spring depends on the height of your door and the drum diameter.
Following the recommended turns for your specific door will help you achieve a perfectly balanced garage door, ensuring smooth and safe operation.
FAQs
Can I use the same number of turns for any garage door height?
No, the number of turns needed for your garage door spring varies based on the height of your door. Refer to the chart on our website to determine the correct number of turns for your specific door.
How do I adjust the spring tension if needed?
If you need to adjust the spring tension, remove one or two quarter turns at a time. Avoid making drastic changes to prevent any unpredictable movements.
Should I engage the lock before raising the door?
If your door has a lock, it’s a good idea to engage it before performing any adjustments. This ensures added safety during the process.
Can I use vise grips if my door doesn’t have a lock?
Yes, you can use vise grips clamped in the track to prevent the rollers from moving, providing an added safety measure.
Why is a perfectly balanced garage door important?
A perfectly balanced garage door ensures smooth and safe operation, extending the lifespan of the door and its components.