How to Measure Garage Door Torsion Springs
When your garage door stops working due to a broken torsion spring, replacing it is not just about convenience—it’s about safety and functionality. Choosing the correct replacement spring requires precise measurements, and even a small error can result in ordering the wrong part, wasted money, or a malfunctioning door.
This comprehensive guide will walk you through the step-by-step process of measuring garage door torsion springs. We’ll cover essential safety warnings, expert tips, and highlight common mistakes to avoid. By the end, you’ll have the confidence to gather accurate measurements—or know when it’s best to call a professional.
⚠️ Safety First: A Critical Warning
Garage door torsion springs are under extreme tension. Improper handling can cause severe injury. Always keep these safety guidelines in mind:
-
Never attempt to unwind or remove a loaded torsion spring without proper winding bars.
-
Wear safety goggles and gloves to protect against sudden releases of tension.
-
Keep children and pets away from the work area.
-
If you are not confident in handling springs, hire a certified garage door technician.
Remember: measuring a broken spring is usually safe. Handling a spring that’s still under tension is not.
Tools You’ll Need
Before you begin, prepare the following tools and equipment:
-
Tape measure (preferably metal for accuracy)
-
Vernier caliper (for inside diameter, optional but recommended)
-
Marker or chalk
-
Business card or small object (to mark coil positions)
-
Safety gear (gloves, goggles)
-
Notebook or phone (to record measurements)
Step 1: Measuring the Wire Size
The wire size is the most important measurement. Even a slight miscalculation can result in a spring that does not fit or operate correctly.
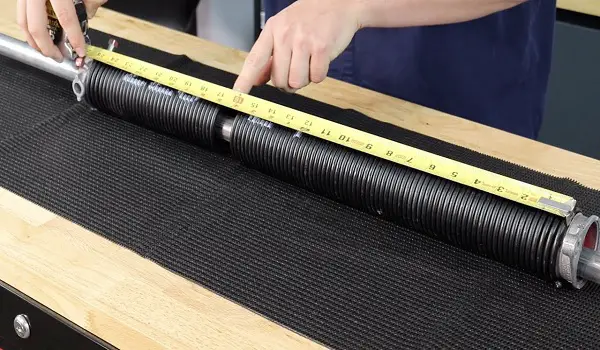
How to Measure:
-
Count 20 coils of the spring.
-
Mark the 20th coil using a business card or chalk.
-
Place the tape measure at the starting coil and measure across to the mark.
-
Note the measurement (in inches or millimeters).
Pro Tip: For higher accuracy, measure 40 coils instead of 20 and divide the result by 40. This reduces human error.
Example:
-
20 coils = 5 inches → Wire size = 0.250″
-
40 coils = 10 inches → Wire size = 0.250″
Step 2: Determining the Spring Length
Next, measure the overall length of the spring.
How to Measure:
-
Stretch your tape measure along the entire black portion of the spring.
-
If your spring is broken into two pieces, measure each piece and add them together.
-
Record the result in inches.
Pro Tip: Always measure when the spring is not under tension. Never try to stretch it for measurement.
Step 3: Finding the Inside Diameter
The inside diameter (ID) is another critical factor in matching your replacement spring.
How to Measure:
-
If the spring is detached: Measure the inside diameter directly with a tape measure or caliper.
-
If the spring is still on the torsion bar: Slide it slightly and measure the inside diameter at the opening.
Pro Tip: A caliper gives more accurate readings than a tape measure, especially on older springs where edges may be worn.
Step 4: Identifying Winding Direction
Garage door torsion springs come in left-hand wind and right-hand wind. Installing the wrong direction will prevent your door from working.
How to Identify:
-
Look at the end of the coil.
-
If the end of the coil points to the right, it’s a right-hand spring.
-
If it points to the left, it’s a left-hand spring.
-
-
On paired systems: one spring will usually have a red winding cone (right-hand) and the other a black cone (left-hand).
Step 5: Confirming the Number of Turns
The number of turns required depends on your door height and the cable drum size.
Formula:
Example:
-
16-foot door (192 inches)
-
Cable drum circumference = 17 inches
-
Turns = (192 ÷ 17) + 1 = 12.29 ≈ 12¼ turns
Pro Tip: Never over-wind or under-wind your springs, as it can cause premature wear or unsafe operation.
Ordering the Correct Spring
Once you have all measurements, you’re ready to order. Prepare the following information:
-
Wire size (e.g., 0.250″)
-
Spring length (round down to the nearest inch if needed)
-
Inside diameter (in inches)
-
Winding direction (left or right)
Ordering Checklist:
✔️ Wire size
✔️ Length
✔️ Inside diameter
✔️ Winding direction
When to Call a Professional
While measuring is safe, installing torsion springs requires skill and the right tools. You should call a professional if:
-
Your garage door uses a high-cycle torsion system.
-
You don’t have proper winding bars.
-
You’re unsure about winding direction or number of turns.
-
The spring system is visibly rusted, bent, or damaged.
Conclusion
Measuring garage door torsion springs is not complicated, but it demands accuracy and attention to detail. By carefully measuring the wire size, length, inside diameter, and winding direction, you can confidently order the correct replacement spring.
However, remember that installation is dangerous without proper tools and experience. When in doubt, consult a licensed garage door technician.
With the right measurements and precautions, you’ll ensure your garage door returns to safe, smooth operation.
Related article
Common Mistakes to Avoid When Determining Torsion Spring Size
How to Tell What Garage Door Spring i Need