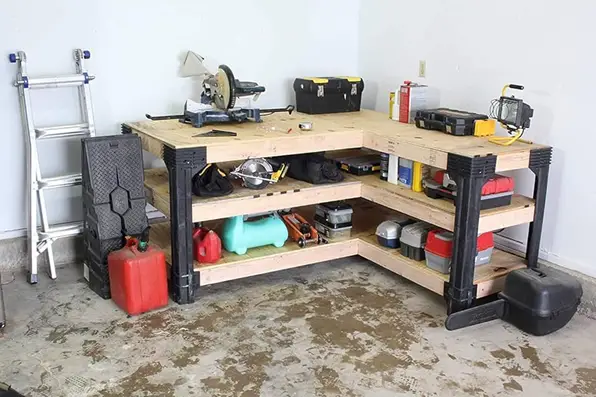
Building a simple workbench for your garage is a fantastic way to create a more organized and efficient workspace. With a sturdy and functional workbench, you can complete various projects more comfortably. Here is a step-by-step guide to making a simple yet strong workbench.
Materials Needed:
Before you start, ensure you have all the necessary materials:
- 2×4-inch lumber: Used for the frame and legs.
- 3/4-inch plywood: Used for the work surface and lower shelf.
- Wood screws: Use 2.5-inch and 1.5-inch screws.
- Wood glue: For added strength.
- Wood stain or paint: Optional, for finishing.
- Sandpaper or a sander: To smooth the surface.
- Safety gear: Gloves and safety glasses.
Required Tools:
- Measuring tape: To measure the length of the wood.
- Circular saw or miter saw: To cut the wood to size.
- Power drill: To drive screws.
- Clamps: To hold pieces together while assembling.
- Drill bits and screwdriver bit: For drilling and screwing.
- Speed square: To ensure precise angles.
Step-by-Step Guide to Building the Workbench
1. Cut the Wood to Size
Before assembly, cut all the wood to the following dimensions:
- Four table legs: Each 36 inches long.
- Four long frame pieces: Each 48 inches long.
- Four short frame pieces: Each 24 inches long.
- Two additional support beams: Each 48 inches long.
- Two side support beams: Each 24 inches long.
Ensure all cuts are precise to achieve a stable and neat final result.
2. Assemble the Workbench Frame
Next, create the workbench frame:
- Arrange two long beams (48 inches) and two short beams (24 inches) into a rectangular shape.
- Apply wood glue at each joint and secure with 2.5-inch wood screws.
- Repeat this step to create both the top and bottom frames of the workbench.
3. Attach the Workbench Legs
- Place the top frame in a standing position.
- Position each leg (36 inches) inside the frame corners.
- Use wood glue and 2.5-inch wood screws to secure each leg.
4. Add Supports and Lower Shelf Frame
- Install the additional support beams (48 inches and 24 inches) halfway up the legs to strengthen the structure.
- Ensure the support beams are level, as they will hold the lower shelf.
- Secure all pieces using screws and wood glue.
5. Install the Work Surface
- Place a 3/4-inch plywood sheet (48×24 inches) on top of the frame.
- Secure it using 1.5-inch wood screws.
6. Install the Lower Shelf
- Cut a plywood sheet to fit the bottom frame.
- Place it inside the lower frame and secure it with wood screws.
7. Finishing and Refinements
- Use sandpaper or a sander to smooth all surfaces and remove sharp edges.
- Optional: Apply wood stain or paint for a more appealing look and added protection from moisture.
- Let the paint or stain dry completely before using the workbench.
Additional Tips for Enhanced Functionality
To make your workbench even more practical, consider adding these features:
- Tool storage: Install hooks or drawers under the workbench to store small tools.
- Wheels on the legs: If you need a mobile workbench, add lockable caster wheels.
- Power outlets and work lights: Attach additional outlets to the side of the workbench for easy access to power tools.
- Scratch-resistant surface: Use a rubber mat or protective covering on the work surface to prevent scratches.
Conclusion
Building a simple workbench for your garage is a relatively easy DIY project that offers many benefits. A sturdy and functional workbench allows you to work more efficiently while keeping your garage tidy. By following the steps above, you can create a workbench tailored to your needs, whether for woodworking, vehicle repairs, or other hobbies.