How to adjust chamberlain garage door opener is an essential task to ensure the smooth and safe operation of your garage door.
By properly setting the travel limits and testing the safety reversal system, you can maintain optimal functionality and protect your vehicles and belongings.
In this article, we will guide you through the step-by-step process of adjusting your Chamberlain garage door opener.
Please note that while we provide detailed instructions, it is important to consult the manufacturer’s manual for complete information and safety guidelines.
Understanding the Purpose of Adjusting a Chamberlain Garage Door Opener
Before diving into the adjustment process, it’s important to understand why adjusting a Chamberlain garage door opener is necessary.
By setting the travel limits, you can control where the door stops when moving up or down.
This prevents any potential damage to vehicles or objects in the garage.
Testing the safety reversal system ensures that the door stops and reverses if it encounters an obstruction during its operation.
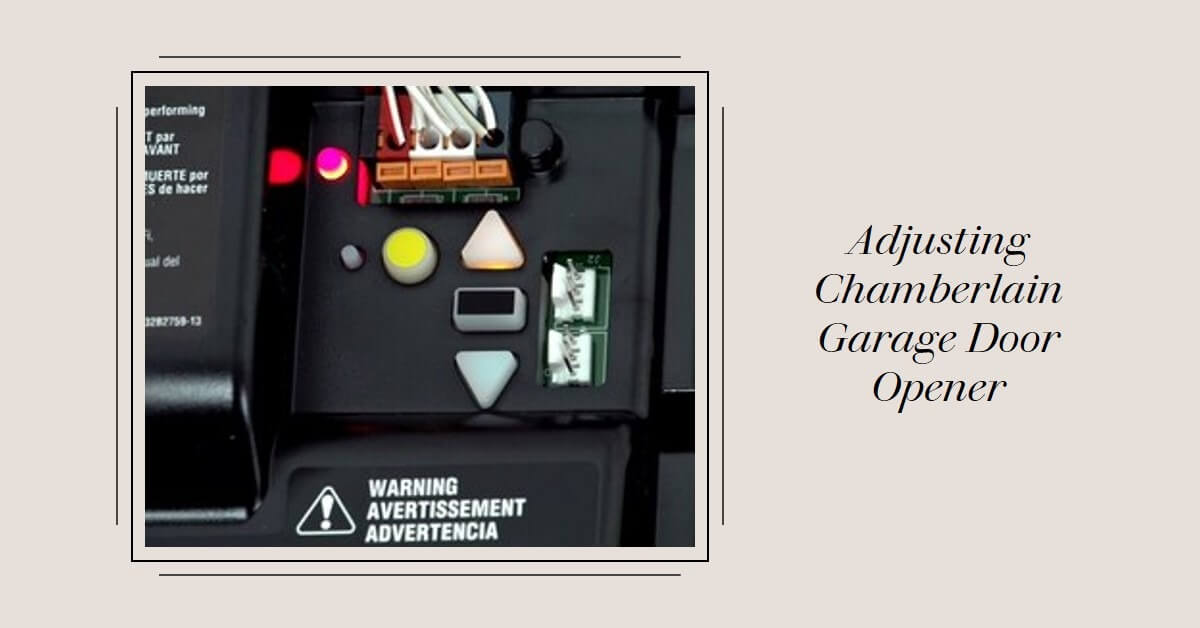
Locating the Programming Buttons
To begin adjusting your Chamberlain garage door opener, you need to locate the programming buttons.
These buttons are typically situated behind a panel on the side of the opener.
Take a moment to identify the specific location of these buttons on your Chamberlain opener.
Step Saver Setup: Simplifying the Programming Process
If your Chamberlain garage door opener was manufactured starting in 2022, you may have the advantage of a “Step Saver Setup” label.
This label indicates that the programming process has been simplified, making it easier for you to adjust your opener.
If your opener has this label, please refer to the accompanying video content for detailed instructions.
However, if your opener does not have the “Step Saver Setup” label, continue reading for alternative programming methods.
Programming Travel Limits for Precise Door Movement
Setting the travel limits of your Chamberlain garage door opener ensures that the door moves to the desired positions accurately. This section will guide you through the process step by step.
1. Press and Hold the Adjustment Button
To initiate the programming process, locate the adjustment button on your Chamberlain opener. Press and hold this button until the up button starts flashing.
It’s important to note that during this programming phase, the safety reversal sensors will be temporarily disconnected, causing their lights to turn off.
2. Setting the Up Limit
After the up button starts flashing, press and hold it until the door reaches the desired fully open position.
It’s crucial to ensure that the fully open door provides adequate clearance to prevent any damage to vehicles or objects in its path.
3. Setting the Down Limit
Once the door is in the fully open position, press and release the adjustment button.
As a result, the garage door opener lights will flash twice, indicating that the programming for the up limit is complete. Subsequently, the down button will start flashing.
Press and hold the down button until the door reaches the desired closed position. Take care to align the door properly to ensure it closes securely.
4. Completing the Programming Process
When the door reaches the correct closed position, press and release the adjustment button once again. The garage door opener lights will flash twice, confirming the completion of the programming process for the down limit.
With these steps, you have successfully programmed the travel limits of your Chamberlain garage door opener.
The safety reversal sensors will automatically reconnect, and their lights will turn back on. The opener will emit a beep sound, and the lights will flash when it enters a force-sensing operation, ensuring enhanced safety and functionality.
If, at any point, the garage door opener lights flash five times, it means that the programming process has timed out, and the travel limits have not been set correctly. In such cases, you will need to restart the process from the beginning.
Read Also:
Chamberlain Garage Door Opener Battery
Testing the Safety Reversal System for Enhanced Safety
After making adjustments to your Chamberlain garage door opener, it is crucial to test the safety reversal system to ensure it functions correctly.
This system is designed to detect obstructions and reverse the door’s movement to prevent accidents or damage. Follow the steps below to perform the safety reversal system test.
1. Obstructing the Safety Sensors
Begin by opening the garage door fully. Next, place an object, such as a box, at least 12 inches high, in the path of the garage door.
Ensure that the object obstructs the safety sensors located near the bottom of the door tracks. When a safety sensor is obstructed or misaligned, the green LED light on the sensor will flash.
Read Also:
Solid Red Light on Genie Garage Door Opener
2. Verifying Proper Safety Reversal Functionality
Using the remote control or control panel, attempt to close the garage door. In a properly functioning system, the door should not close when the safety sensors are obstructed.
The system will detect the obstruction and reverse the door’s movement.
It is crucial to test the safety reversal system after making any adjustments to your garage door opener.
This ensures that the system is functioning correctly and provides an additional layer of safety for you and your family.
Monthly Testing of the Safety Reversal System
To maintain optimal safety standards, it is recommended to perform a monthly test of the safety reversal system on your Chamberlain garage door opener.
This quick test helps ensure the continued functionality of the system. Follow the steps below for the monthly safety reversal system test.
- Open the garage door fully.
- Place a one-and-a-half-inch board or a two-by-four laid flat on the floor, centered under the garage door.
- Using the remote control or control panel, press the button to close the door.
- The door should stop and reverse upon contact with the board.
- The door will return to the fully open position automatically.
- During this process, the opener will emit a beep sound, and the lights will flash slowly five times.
Performing this monthly test ensures that the safety reversal system is working correctly and provides you with peace of mind regarding the safety of your garage door.
Read Also:
Chamberlain vs LiftMaster Garage Door Openers
Conclusion
How adjust the Chamberlain garage door opener is a crucial maintenance task that ensures proper functionality and enhanced safety.
By following the step-by-step instructions outlined in this article, you can program the travel limits of your opener and test the safety reversal system.
Remember to consult the manufacturer’s manual for comprehensive instructions and safety guidelines specific to your Chamberlain garage door opener.
Performing regular monthly tests of the safety reversal system helps maintain a secure and reliable operation for your garage door.
With these adjustments and tests in place, you can enjoy a well-functioning and safe garage door system for years to come.


