How to Paint Garage Floor

If you’re looking for garage floor painting tips and want to tackle this DIY project, you’ve come to the right place. In this guide, I’ll share step-by-step instructions to help you achieve professional-looking results while saving money.
Painting your garage floor is a great way to enhance its appearance and protect it from stains and damage. Whether you use your garage space for car parking, storage, or as a workshop, a fresh coat of paint can transform the look and feel of the area.
In this guide, I’ll cover everything you need to know about how to paint your garage floor. From preparing the surface to choosing the best paint and applying it correctly, I’ll walk you through each step. I’ll also share some tips for achieving a professional finish and provide guidance on curing and maintaining your painted garage floor.
So, if you’re ready to take on the DIY challenge of painting your garage floor, let’s get started. Follow this guide, and soon you’ll have a beautiful, durable, and polished garage floor that reflects your personal style and attention to detail.
Preparing Your Garage Floor for Painting
Before you begin painting your garage floor, it’s important to properly prepare the surface. This will ensure that the paint adheres well to the concrete and lasts longer. Follow these necessary steps to clean, repair, and prime your garage floor for painting:
- Clean the floor: Start by removing any existing paint, sealants, or coatings from the concrete. Use a heavy-duty cleaner and a pressure washer to thoroughly clean the surface. Make sure to remove any grease, oil, dirt, and debris. Allow the floor to dry completely before proceeding.
- Repair the cracks: Inspect the garage floor for any cracks or damages. Use a concrete patching compound to fill in the cracks and smooth the surface. Follow the manufacturer’s instructions for proper application and drying time.
- Evaluate the moisture: Check for any moisture issues in your garage. Tape a plastic sheet to the floor and leave it for 24-48 hours. If there is condensation or water droplets underneath the plastic, you may need to address the moisture problem before painting. Consult with a professional if necessary.
- Etch the concrete: After ensuring the floor is dry and free from moisture, use a concrete etching solution to prepare the surface for better paint adhesion. Follow the manufacturer’s instructions for dilution, application, and safety precautions.
- Prime the floor: Once the concrete is etched and cleaned, apply a primer specifically designed for garage floors. Use a brush or roller to evenly coat the entire floor surface. Allow the primer to dry completely as indicated on the product label.
By thoroughly preparing your garage floor, you will create a solid foundation for your paint and ensure a professional and long-lasting finish.
Choosing the Best Garage Floor Paint
Selecting the right paint for your garage floor is crucial to ensure a durable and long-lasting finish. With so many options available, it can be overwhelming to determine which one is best for your specific needs. In this section, I will provide you with information on the different types of garage floor paints, including the popular epoxy options, and offer tips to help you choose the best one.
Types of Garage Floor Paints
When it comes to garage floor paints, there are several types to consider. Epoxy garage floor paint is a popular choice due to its superior durability and resistance to chemicals, stains, and spills. This type of paint forms a strong bond with the concrete surface, creating a protective and long-lasting layer.
Another option is latex acrylic garage floor paint, which is known for its ease of use and affordability. It provides a decent level of protection and is available in a wide range of colors. However, it may not be as durable as epoxy paint.
For those looking for a more decorative finish, there are also garage floor coatings that incorporate decorative flakes or metallic pigments. These coatings add a unique aesthetic touch and can help hide imperfections on the floor.
Tips for Choosing the Best Garage Floor Paint
When selecting the best garage floor paint for your needs, consider the following factors:
- Durability: Evaluate the paint’s durability and resistance to chemicals, stains, and abrasions. This is especially important if you plan on using your garage for heavy-duty activities or parking vehicles.
- Application: Consider the ease of application and whether the paint requires any special preparation or priming.
- Aesthetics: Choose a paint that matches your desired aesthetic, whether it’s a solid color, pattern, or decorative flakes.
- Budget: Take into account your budget and compare the costs of different paint options. Remember that investing in a higher-quality paint may save you money in the long run by reducing the need for frequent touch-ups or recoating.
Remember, the best garage floor paint for one person may not be the same for another. Consider your specific needs and preferences to make an informed decision.
Gathering the Right Tools and Materials
When it comes to DIY garage floor painting, having the right tools and materials is essential for a successful and efficient painting process. Here, I’ve compiled a comprehensive list of everything you’ll need to ensure a professional-looking finish.
Tools
- Brushes: A high-quality brush with synthetic bristles will help you achieve smooth and even coverage.
- Rollers: Choose a roller with a thick nap to easily apply paint to larger areas of your garage floor.
- Paint Trays: Use a sturdy paint tray to hold your paint and facilitate the roller application.
- Painting Tape: This will come in handy for creating clean and straight edges along the perimeter of your garage floor.
- Putty Knife: Use a putty knife for scraping off any loose paint or debris from the surface.
- Sanding Block: If your garage floor has imperfections, a sanding block will help smooth them out before painting.
- Clean Cloth or Tack Cloth: Use a cloth to wipe away any dust or debris from the surface before painting.
- Dust Mask: Protect yourself from inhaling dust particles by wearing a dust mask throughout the painting process.
Materials
- Garage Floor Paint: Choose a high-quality paint specifically formulated for garage floors. Look for durability, resistance to chemicals and stains, and ease of application.
- Primer: Depending on the condition of your garage floor, a primer may be necessary to ensure proper adhesion and longevity of the paint.
- Concrete Etcher or Cleaner: Before painting, you’ll need to clean and etch the concrete surface to remove any dirt, grease, or previous coatings. Look for a product specifically designed for garage floors.
- Patch or Crack Filler: If your garage floor has cracks or holes, a patch or crack filler will help repair them before painting.
- Concrete Sealer: Applying a concrete sealer after painting can enhance the durability and longevity of your garage floor paint.
- Protective Gear: Wear gloves, safety glasses, and appropriate clothing to protect yourself from paint splatters and any chemical fumes.
By gathering all the necessary tools and materials before starting your DIY garage floor painting project, you’ll ensure a smooth and efficient process from start to finish. Having everything on hand will save you time and help you achieve professional-looking results.
Applying the Garage Floor Paint
Now that you have prepared your garage floor, it’s time to apply the paint and give your space a fresh new look. Follow this step-by-step process to achieve a seamless and even coat on your garage floor.
Clean the Surface
Before applying the paint, ensure that the floor is clean and free from debris. Sweep or vacuum the floor to remove any loose dirt or dust. Use a mild detergent and water solution to clean any stubborn stains or grime. Rinse the floor thoroughly and allow it to dry completely before proceeding.
Apply a Primer
Applying a primer is an important step to ensure proper adhesion of the paint and increase its durability. Choose a primer specifically designed for concrete floors. Use a roller or brush to apply an even coat of primer to the entire surface. Follow the manufacturer’s instructions regarding drying time before moving on to the next step.
Mix and Apply the Paint
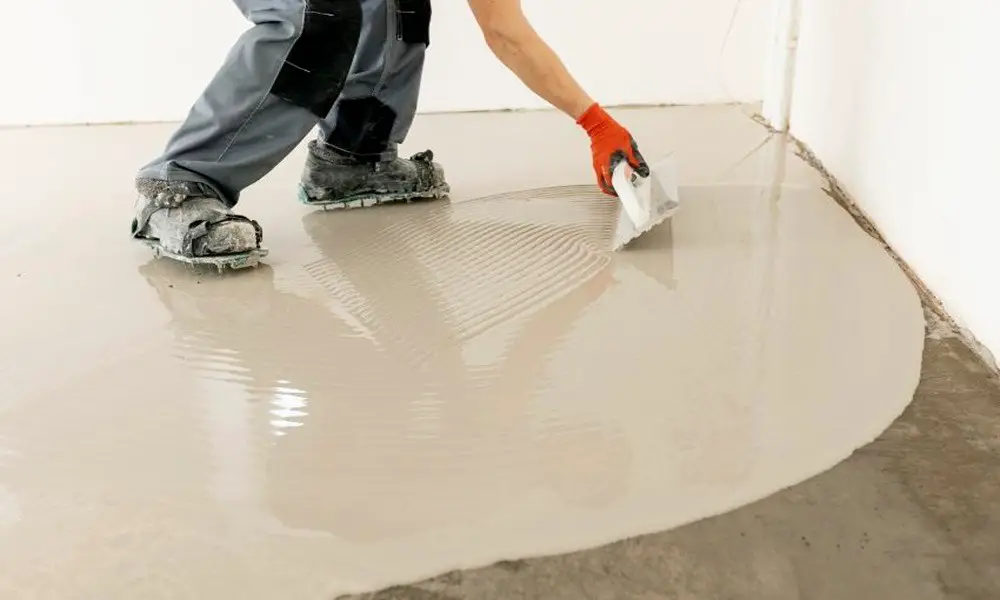
Before starting, thoroughly mix the paint according to the manufacturer’s instructions. Pour the paint into a paint tray and use a roller or brush to apply the paint in even, overlapping strokes. Work in small sections, starting from one corner and moving towards the exit. Be sure to maintain a wet edge to avoid visible lines or unevenness.
Pro Tip: Consider using an epoxy-based garage floor paint for enhanced durability and resistance to chemicals, stains, and abrasion.
Create a Second Coat (Optional)
If desired, you can apply a second coat of paint to achieve a more vibrant and long-lasting finish. Allow the first coat to dry completely before applying the second coat. Follow the same painting technique as before, ensuring even coverage.
Let the Paint Cure
After applying the final coat, allow the paint to cure according to the manufacturer’s instructions. This usually takes at least 24 hours but can vary depending on the type of paint used. Avoid walking or placing any objects on the freshly painted surface until it has fully cured.
| Materials and Tools Needed for Applying Garage Floor Paint |
|---|
| Garage floor paint |
| Primer |
| Roller or paintbrush |
| Paint tray |
| Mild detergent |
| Water |
| Broom or vacuum |
| Paint stirrer or mixer |
By following these steps and using the right techniques, you can achieve a professional-looking and long-lasting finish on your garage floor. Enjoy your newly transformed space!
Tips for Achieving a Professional Finish
If you want your garage floor to look professional and polished, there are several additional steps you can take. These finishing touches will elevate the overall appearance of your garage floor and make it stand out. Incorporate these garage floor finishing ideas to achieve a sleek and impressive finish:
Create a Two-Tone Effect
Consider using two different colors of paint to create a stylish two-tone effect on your garage floor. This can be done by painting the main area of the floor in one color and then applying a contrasting color to the edges or border. This technique adds visual interest and gives your garage floor a more contemporary look.
Add a Decorative Stencil
Another way to enhance the appearance of your garage floor is by adding a decorative stencil. Choose a stencil pattern that complements the overall aesthetics of your garage and use it to create a design on the floor. This can be a simple geometric pattern, a logo, or even your initials. Stenciling adds a unique touch and makes your garage floor truly one-of-a-kind.
Apply a Clear Topcoat
To achieve a glossy and professional-looking finish, consider applying a clear topcoat to your garage floor. The topcoat acts as a protective layer, enhancing the durability of the paint and providing a shiny finish. It also makes it easier to clean and maintain your garage floor in the long run.
Use Epoxy Chips or Flakes
If you want to add texture and dimension to your garage floor, consider using epoxy chips or flakes. These decorative additives can be sprinkled onto the wet paint to create a speckled or textured effect. Epoxy chips come in a variety of colors, allowing you to customize your garage floor to your preference.
Install Rubber or PVC Flooring Tiles
If you’re looking for a more versatile and temporary option, consider installing rubber or PVC flooring tiles on top of your painted garage floor. These tiles are easy to install and can be easily replaced if damaged. They provide added cushioning and can withstand heavy weight, making your garage floor more comfortable and resistant to wear and tear.
By incorporating these garage floor finishing ideas, you can achieve a professional and visually appealing finish that transforms your garage into a functional and stylish space.
Curing and Maintaining Your Painted Garage Floor
Once you’ve completed the painting process, it’s crucial to allow the paint to properly cure and take necessary steps to maintain its longevity. Curing refers to the time it takes for the paint to fully harden and adhere to the garage floor surface. This step is essential to ensure the durability and performance of your newly painted garage floor.
To properly cure your painted garage floor, follow these important guidelines:
- Stay off the freshly painted floor: Avoid walking or placing any heavy objects on the newly painted surface for at least 24-48 hours. This will allow the paint to dry and cure without any disturbances, ensuring a strong bond.
- Maintain proper ventilation: Keep the garage well-ventilated during the curing process. This will help with the drying and curing of the paint, ensuring a smooth and even finish.
- Avoid exposure to moisture: Prevent water or any other liquids from coming into contact with the painted surface during the curing period. Moisture can interfere with the curing process and result in a compromised finish.
- Follow manufacturer’s instructions: Different types of garage floor paints may have specific curing instructions provided by the manufacturer. Be sure to read and follow these instructions carefully for optimal results.
Tips for Maintaining Your Painted Garage Floor
To keep your painted garage floor looking its best and prolong its lifespan, follow these maintenance tips:
- Clean regularly: Sweep or vacuum your garage floor regularly to remove dirt, debris, and dust. Use a mild detergent with warm water for occasional deep cleaning. Avoid using harsh chemicals or abrasive scrubbers that can damage the painted surface.
- Address spills immediately: Accidental spills of oil, chemicals, or other substances can stain or damage the paint. Clean up spills promptly using an absorbent material and then clean the affected area with warm soapy water.
- Protect against heavy objects: Place mats or protective pads under heavy equipment, tools, or vehicle tires to prevent scratches or indentation on the painted surface.
- Inspect for damage: Regularly inspect your painted garage floor for any signs of chipping, peeling, or cracks. Address any issues promptly by applying touch-up paint in the affected areas to prevent further damage and maintain the integrity of the surface.
Troubleshooting and Frequently Asked Questions
Painting a garage floor can be a rewarding DIY project, but it’s not without its challenges. In this section, I will address common issues that may arise during the painting process and provide helpful troubleshooting tips. Additionally, I will answer some frequently asked questions to further assist you in achieving the best results.
Troubleshooting Tips
- Problem: Paint peeling or bubbling
Solution: Peeling or bubbling paint can occur if the surface was not properly prepared or if moisture is present. To fix this issue, you’ll need to remove the loose paint, repair any underlying damage, and ensure the surface is completely dry before applying a new coat of paint. - Problem: Uneven color or texture
Solution: Achieving a smooth and even finish is crucial for a professional-looking garage floor. If you notice uneven color or texture, it may be due to improper application techniques or using the wrong type of paint. Make sure to follow the manufacturer’s instructions and use long, even strokes for a consistent result. - Problem: Paint not adhering to the surface
Solution: If the paint is not sticking to the garage floor, it could be because the surface was not properly cleaned or primed. Ensure that the floor is free from dirt, oil, and other contaminants, and apply a suitable primer before painting.
Frequently Asked Questions
- Do I need to remove all the items from my garage before painting the floor?
It is highly recommended to clear out your garage before starting the painting process. This will allow you to have a clean and obstacle-free area to work in, ensuring better results and preventing accidental damage to your belongings. - Can I paint over an existing painted garage floor?
Yes, you can paint over an existing painted garage floor. However, it’s important to check the condition of the existing paint and ensure good adhesion. If the previous paint is peeling or in poor condition, it’s best to remove it before applying a new coat. - How long does it take for the garage floor paint to dry?
The drying time of the garage floor paint depends on various factors, including the type of paint used and the temperature and humidity of the environment. Generally, it takes around 24-48 hours for the paint to dry completely. However, it’s best to refer to the manufacturer’s instructions for specific drying times.
Conclusion
Painting your garage floor is a cost-effective and transformative project that can significantly enhance the look and functionality of your space. By following the step-by-step guide provided in this article, you can achieve a durable and sleek finish that will withstand the test of time.
Not only will a painted garage floor improve the overall aesthetics of your garage, but it will also serve as a protective barrier against stains, spills, and other forms of damage. Whether you choose aepoxy garage floor paint or another type, the right paint selection and application techniques will ensure long-lasting results.
With a clean and polished garage floor, you’ll have a space that reflects your personal style and attention to detail. It’s time to unleash your creativity and create an organized and inviting environment that you can be proud of. So go ahead, gather your tools and materials, prepare the surface, and start painting your garage floor today!


