How to Measure Square Footage of a Room for Flooring
What is Square Footage?
Before we dive into the measurement process, let’s start with the basics. Square footage is a unit of measurement used to quantify the area of a two-dimensional space, such as a room, floor, or piece of land.
In the context of flooring, knowing the square footage of a room is essential to determine how much flooring material you need for installation.
Why is it Important to Measure Square Footage When Buying Flooring?
Accurate measurement of square footage is paramount when purchasing flooring for several reasons:
- Cost Estimation: Knowing the square footage helps you estimate the amount of flooring material required, preventing over-purchasing and saving you money.
- Minimizing Wastage: Proper measurements reduce the likelihood of ordering excess material, which can lead to unnecessary waste.
- Seamless Installation: Precise measurements ensure that the flooring installation goes smoothly, resulting in a polished, professional finish.
- Budget Management: Accurate square footage measurements are crucial for budgeting and cost control, preventing unexpected expenses.
Now that you understand the significance of measuring square footage, let’s get into the nitty-gritty of how to do it effectively.
How to Measure Square Footage of a Room for Flooring (Step-by-Step Guide)

Step 1: Gather Your Supplies
Before embarking on your flooring project, it’s vital to gather the necessary tools and materials to ensure a smooth measurement process. These are the essentials you’ll need:
- Tape Measure: A reliable and accurate tape measure is your best friend in this endeavor. Look for one with both imperial and metric units for versatility.
- Calculator (Optional): While not obligatory, having a calculator on hand can significantly expedite the calculations, especially if you’re dealing with complex room shapes or multiple areas.
Step 2: Measure the Length of the Room
Begin by measuring the length of the room. Here’s how you can do it effectively:
- Starting Point: Identify the starting point of your measurement. It’s best to begin at one of the room’s corners, preferably the one with the longest, straightest wall. If the room has multiple straight walls, any of them will suffice.
- Stretch the Tape: Carefully extend your tape measure along the wall, holding it taut, and align it with the baseboard or wall edge. Make sure it runs straight and doesn’t sag or kink.
- Record the Measurement: Once the tape measure is aligned correctly, note the length of the room. Be as precise as possible, taking measurements to the nearest inch.
Step 3: Measure the Width of the Room
Moving on to the width of the room, follow these steps for precise measurements:
- Perpendicular to Length: Measure the width perpendicular to the length you measured in Step 2. Ensure you are still using the longest and straightest sections.
- Stretch and Record: Extend the tape measure along the width, aligning it with the baseboard or wall edge. Again, make sure the tape measure is straight, taut, and not kinked. Record the width measurement.
Step 4: Multiply the Length by the Width
Now, it’s time to calculate the square footage of the room. This step is straightforward:
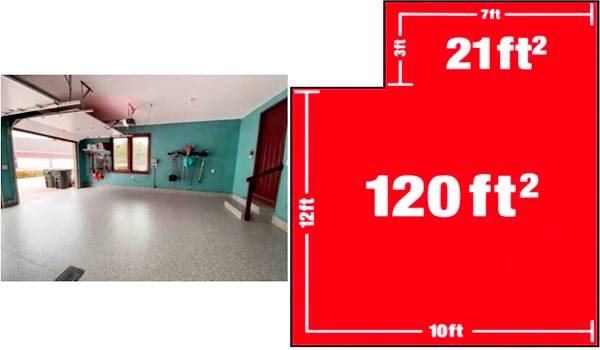
- Simple Multiplication: Multiply the length measurement from Step 2 by the width measurement from Step 3. This will give you the square footage of the room. For instance, if the length is 12 feet, and the width is 10 feet, the calculation would be 12 x 10 = 120 square feet.
Step 5: Account for Irregular Shapes
For rooms with irregular shapes, or if you’re dealing with nooks and crannies, follow these additional steps to ensure accurate measurements:
- Divide and Conquer: Divide the room into smaller, manageable rectangles. You can do this by identifying separate sections within the room, such as alcoves or nooks.
- Measure and Calculate: For each of these sections, apply the same measurement process as described in Steps 2 and 3. Calculate the square footage of each individual section.
- Sum the Sections: Once you have the square footage for each section, add them all together to get the total square footage for the entire room. This method is particularly useful when dealing with spaces that have multiple nooks and crannies.
Tips for Measuring Square Footage:
- Always measure to the nearest inch to ensure precision.
- Round up the square footage to the nearest whole number. This extra material acts as a buffer for any unexpected mishaps during installation.
- If the room has irregular shapes, it’s helpful to create a sketch or diagram of the room with labeled dimensions before you start measuring.
- If you’re not comfortable with measuring the room yourself, consider hiring a professional to ensure accuracy.
Conclusion
Measuring the square footage of a room for flooring is an essential task that should not be overlooked. Accurate measurements prevent over-ordering or under-ordering of flooring materials, saving you time and money.
Whether you are installing hardwood, carpet, tile, or any other type of flooring, following our step-by-step guide ensures a seamless and successful project.
Remember that precise measurements are a testament to a professional and well-planned flooring installation.
Whether you’re a homeowner looking to refresh your space or a contractor working on a project, knowing how to measure square footage for flooring is a skill that will serve you well in achieving a beautiful and functional floor.
Now that you’ve learned how to measure square footage of a room for flooring, you’re well-equipped to tackle your flooring project confidently and efficiently. Happy measuring and flooring installation!
For more flooring-related tips, including a convenient flooring calculator, types of flooring, flooring installation, and flooring care and maintenance, check out our other articles. We’re here to guide you through every step of your flooring journey, ensuring your project’s success from start to finish.


